Project Manager
Introduction
Project Manager is an activity-based costing tool for your project and job costing applications. Project Manager provides an easy way to manage resources and track the status of each project task. You can also record material consumption, schedule project tasks, monitor dates, record activity cost, view material requirements and manage subcontractor activities.
Application Description
The add-on Project Manager was developed to enhance the Microsoft Dynamics 365 Business Central Project Granule.
The module adds fundamental usability improvements to the Business Central Project Granule, making it easier to manage resources, track project status, record consumption of items, schedule project tasks, view costs and material requirements and manage subcontractor activities, all within a single integrated software solution.
Application Setup
Project Manager Setup
All necessary settings can be defined in the Project Manager Setup page. Use the search icon, enter Project Manager Setup, and then choose the related link.
The Project Manager Setup is the main setup page and includes all options related to Project Manager.
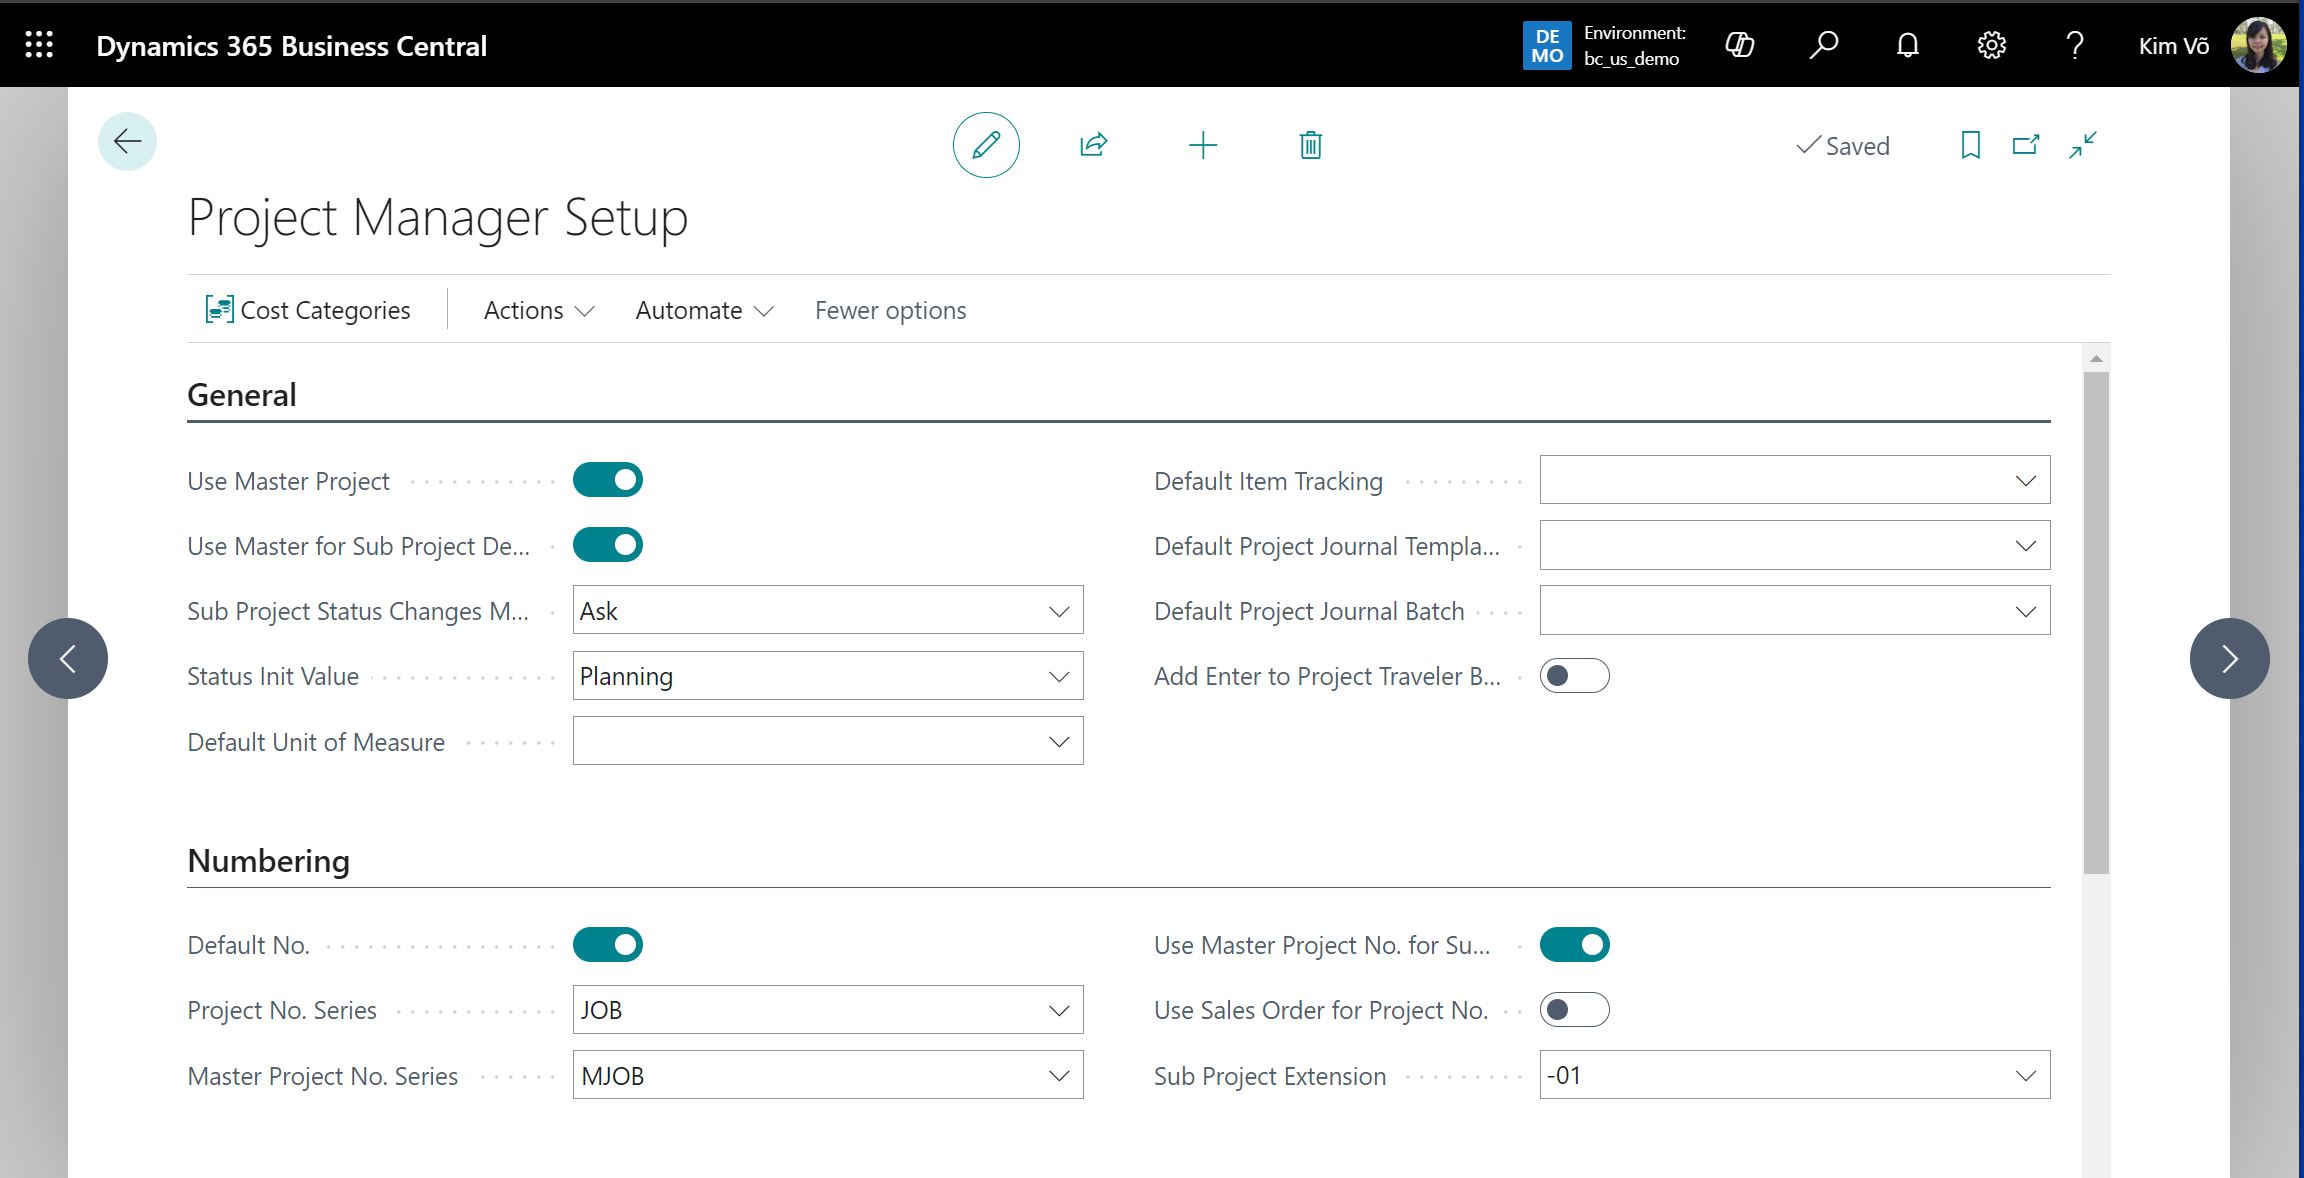
The list below shows the different settings available in the Project Manager Setup.
| Setting | Description |
|
Use Master Project
|
Defines if Master Project should be used. |
| Use Master for Sub Project Defaults | Defines if the Sub Project should take defaults from the Master Project. |
| Sub Project Status Changes Master | Defines if the Master Project status should be changed accordingly as soon as the Sub Project status is changed. |
| Status Init Value | The status that new Project should be started with. |
| Default Unit of Measure | Unit of Measure to be used on planning lines. |
| Default Item Tracking | Item Tracking to be used on planning lines. |
| Default Project Journal Template | Project Journal Template to be used. |
| Default Project Journal Batch | Project Journal Batch to be used. |
| Add Enter to Project Traveler Barcodes | Specifies the value of the Add Enter to Project Traveler Barcodes field. |
| Use Master Project Number for Sub Project | Defines if the Sub Project Number should be the Master Project No. plus the Sub Project extension. |
| Use Sales Order for Project No. | Defines if Sales Order No. should be used for Project No. |
| Sub Project Extension | Extension numbering format to be used for Sub Project. |
| Requisition Direct Cost From Project Budget | Defines if the Unit Cost from Planning lines should be used for Requisition. |
| Requisition Worksheet Template | Specifies the Worksheet Template to be used. |
| Show any Buy-from Vendor on Project Planning Line | Defines if any Buy-from Vendor can be shown on Planning lines. |
| Use Description from Project Planning line for Purchasing | Defines if Description from Project Planning line should be used for Project Purchasing. |
| Default Revenue Account No. | Revenue Account No. to be used on Project. |
| Enable Project Shipments | Enable Project Shipments Functionality. |
| Use Project Task Description on Documents | Defines if Project Task Description should be used for Documents. |
| Default Quantity to Ship | Specifies the Default value for the Qty. to Ship field. |
Cost Categories
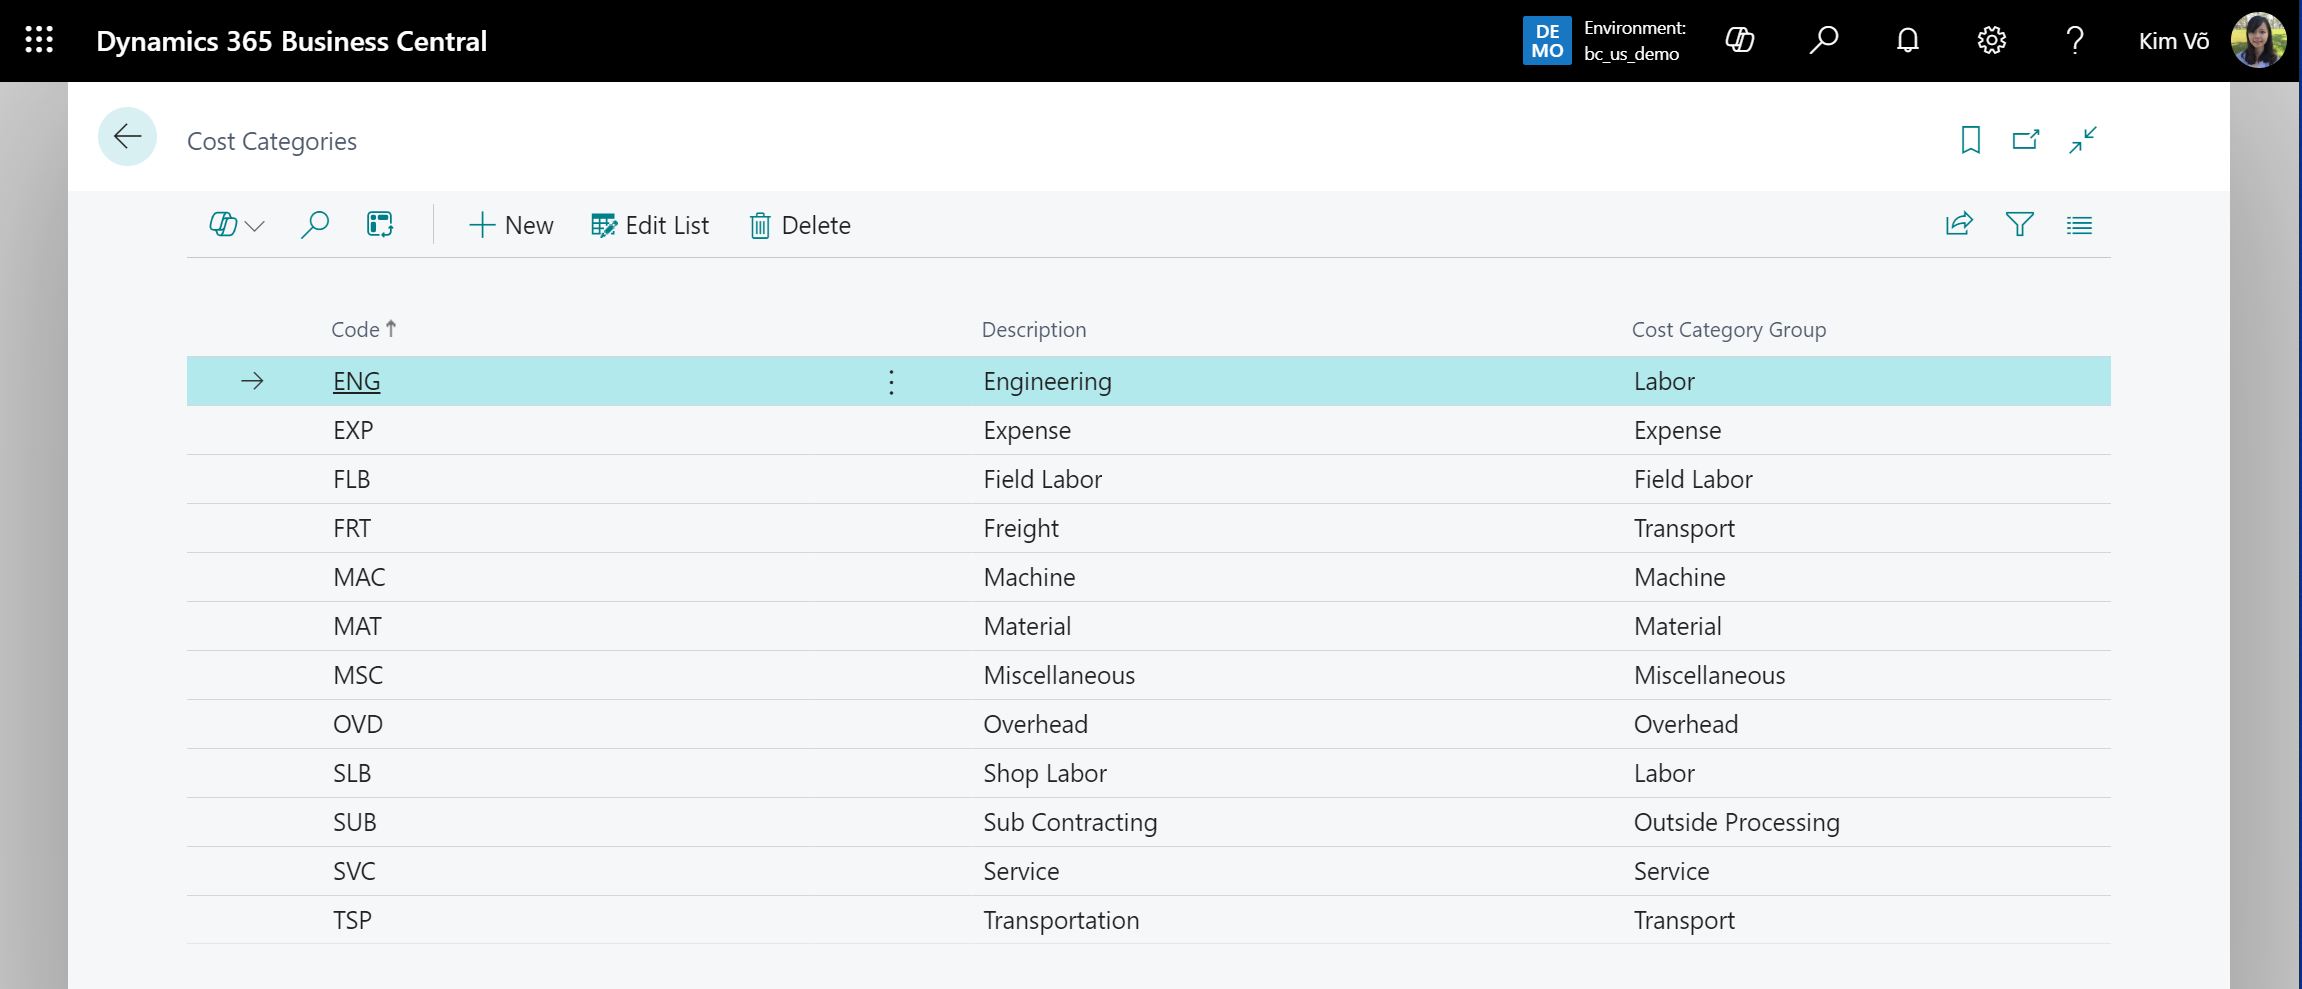
Cost Categories can be used to categorize Project Planning Line with an additional category.
Use the search icon, enter Cost Categories, and then choose the related link. Here you can add more categories and be sure to to assign the appropriate Cost Category Group to each one you add.
Application Workflow
Create Project
Copy Project
You can create a Project and then create Project Task lines and Project Planning Lines for it.
- Choose the Search icon, enter Projects, and then choose the related link.
- Choose the New action. If you have enabled the Use Master Project option in Project Manager Setup, the system would ask if you want to create a Master Project. Click Yes if you need a new Master Project or click No and choose an existing Master Project. Then fill in the fields as necessary. Hover over a field to read a short description.
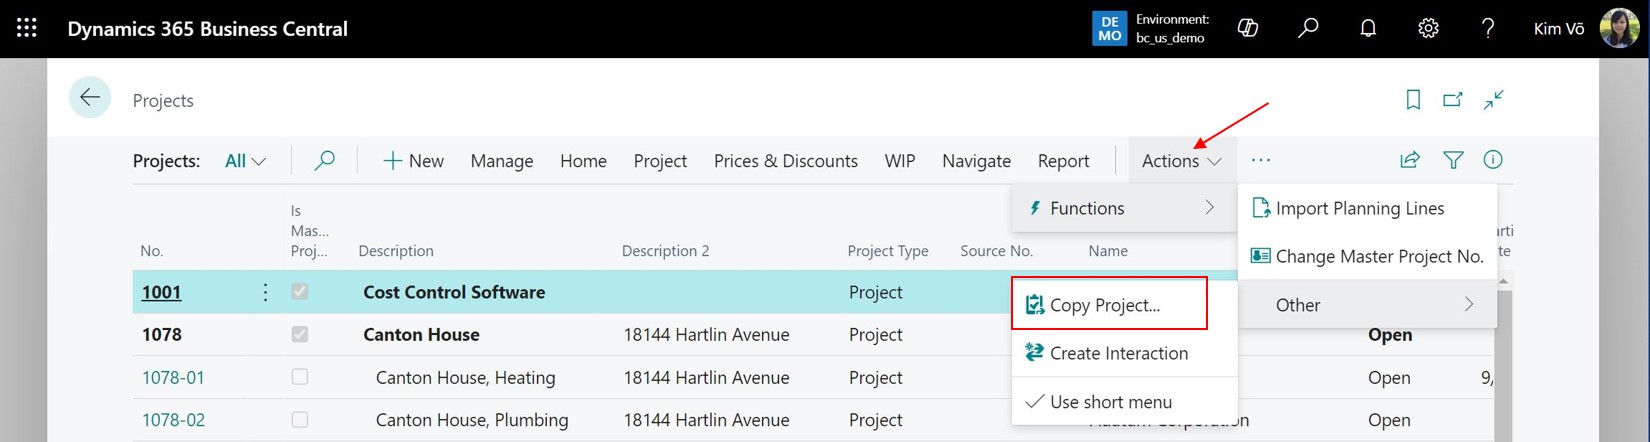
- To base the project on information from another project, choose the Copy Project action, fill in the fields as necessary, and then choose the OK button.
You can create a Project Task by adding a line in Tasks FastTab on Project card.
- Open a relevant Project card.
- On the Tasks FastTab, fill in the fields as necessary on a new line.
- To indent tasks and create a hierarchy, Choose the Tasks action, the then choose Indent Project Tasks action.
- To specify the project tasks with information on other project tasks, choose the Copy Project Tasks from action, fill in the fields as necessary, and then choose the OK button.

Import Planning Lines
After creating a Project Task with type Posting, you can create Planning Lines for it. A Planning Line can capture the information that you want to track for a Project and it can have one of the following types: Budget, Billable or Both Budget and Billable.
You can either add Planning Lines manually or via Import Planning Lines functionality on Project card.
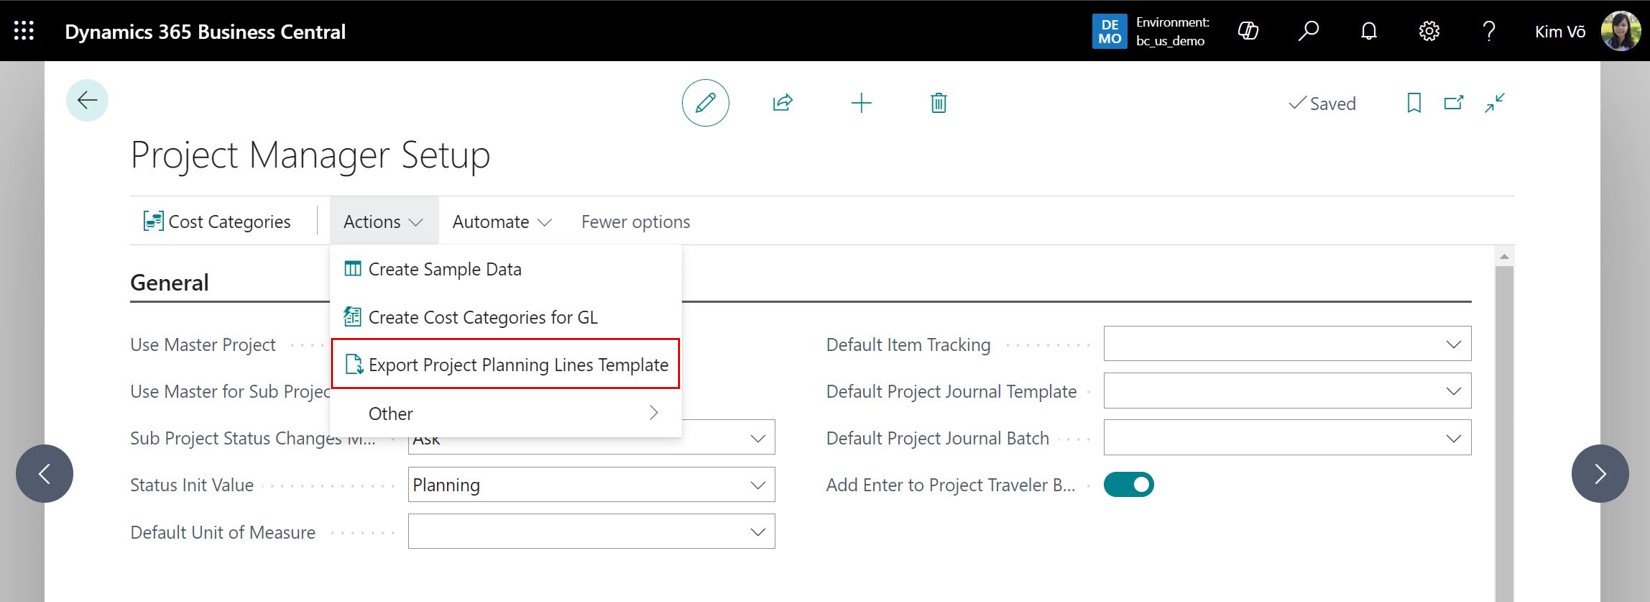
- Download a Project Planning Lines template from Project Manager Setup page: Action -> Export Project Planning Line Template. An excel template should be downloaded and you can prepare the planning lines to import.
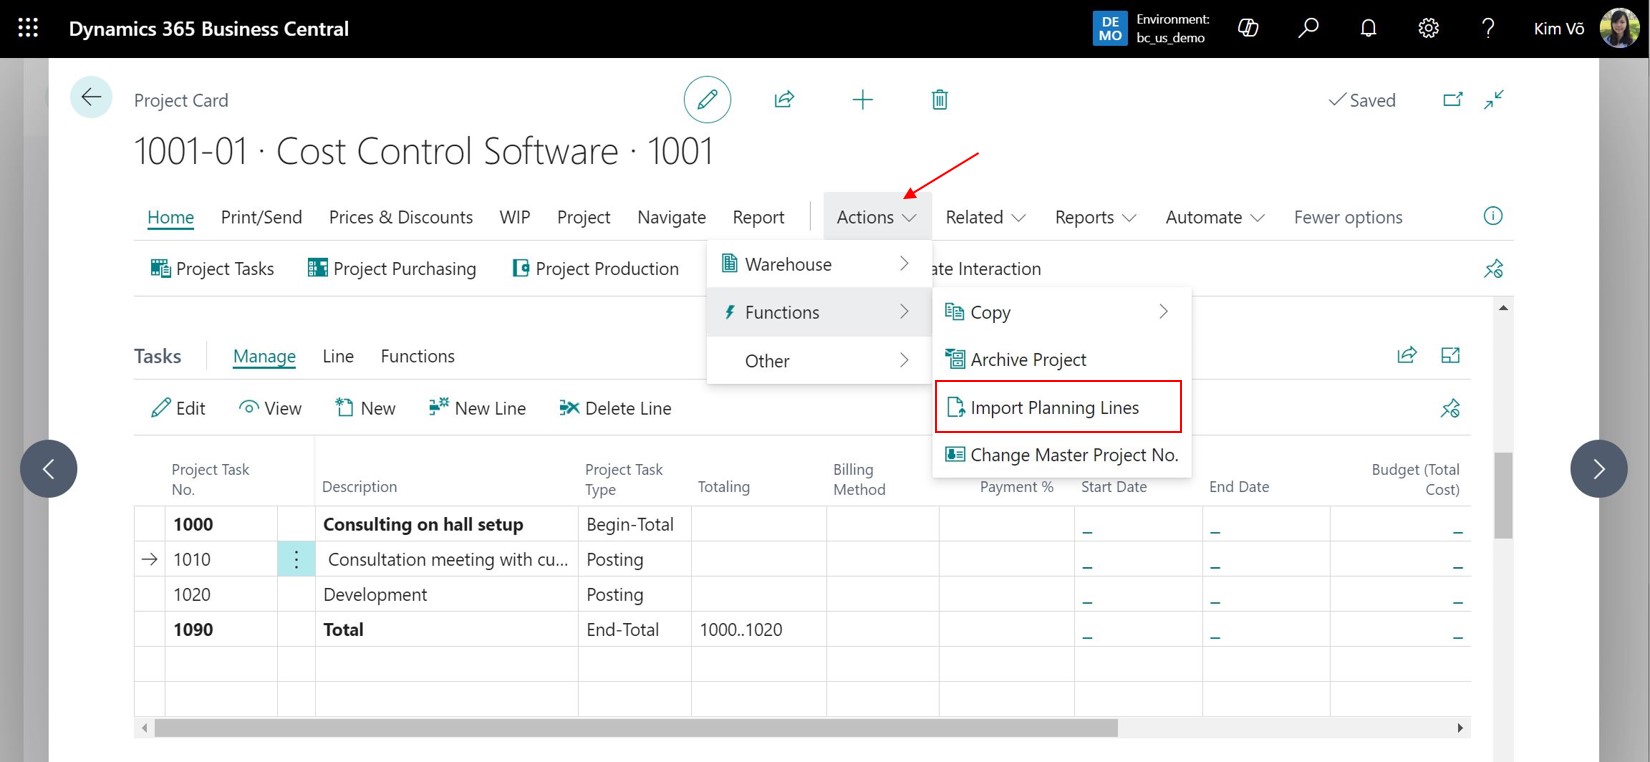
- On Project card: Action -> Functions -> Import Planning Lines. Here you can upload the prepared Excel file and the Planning Lines would be imported automatically.
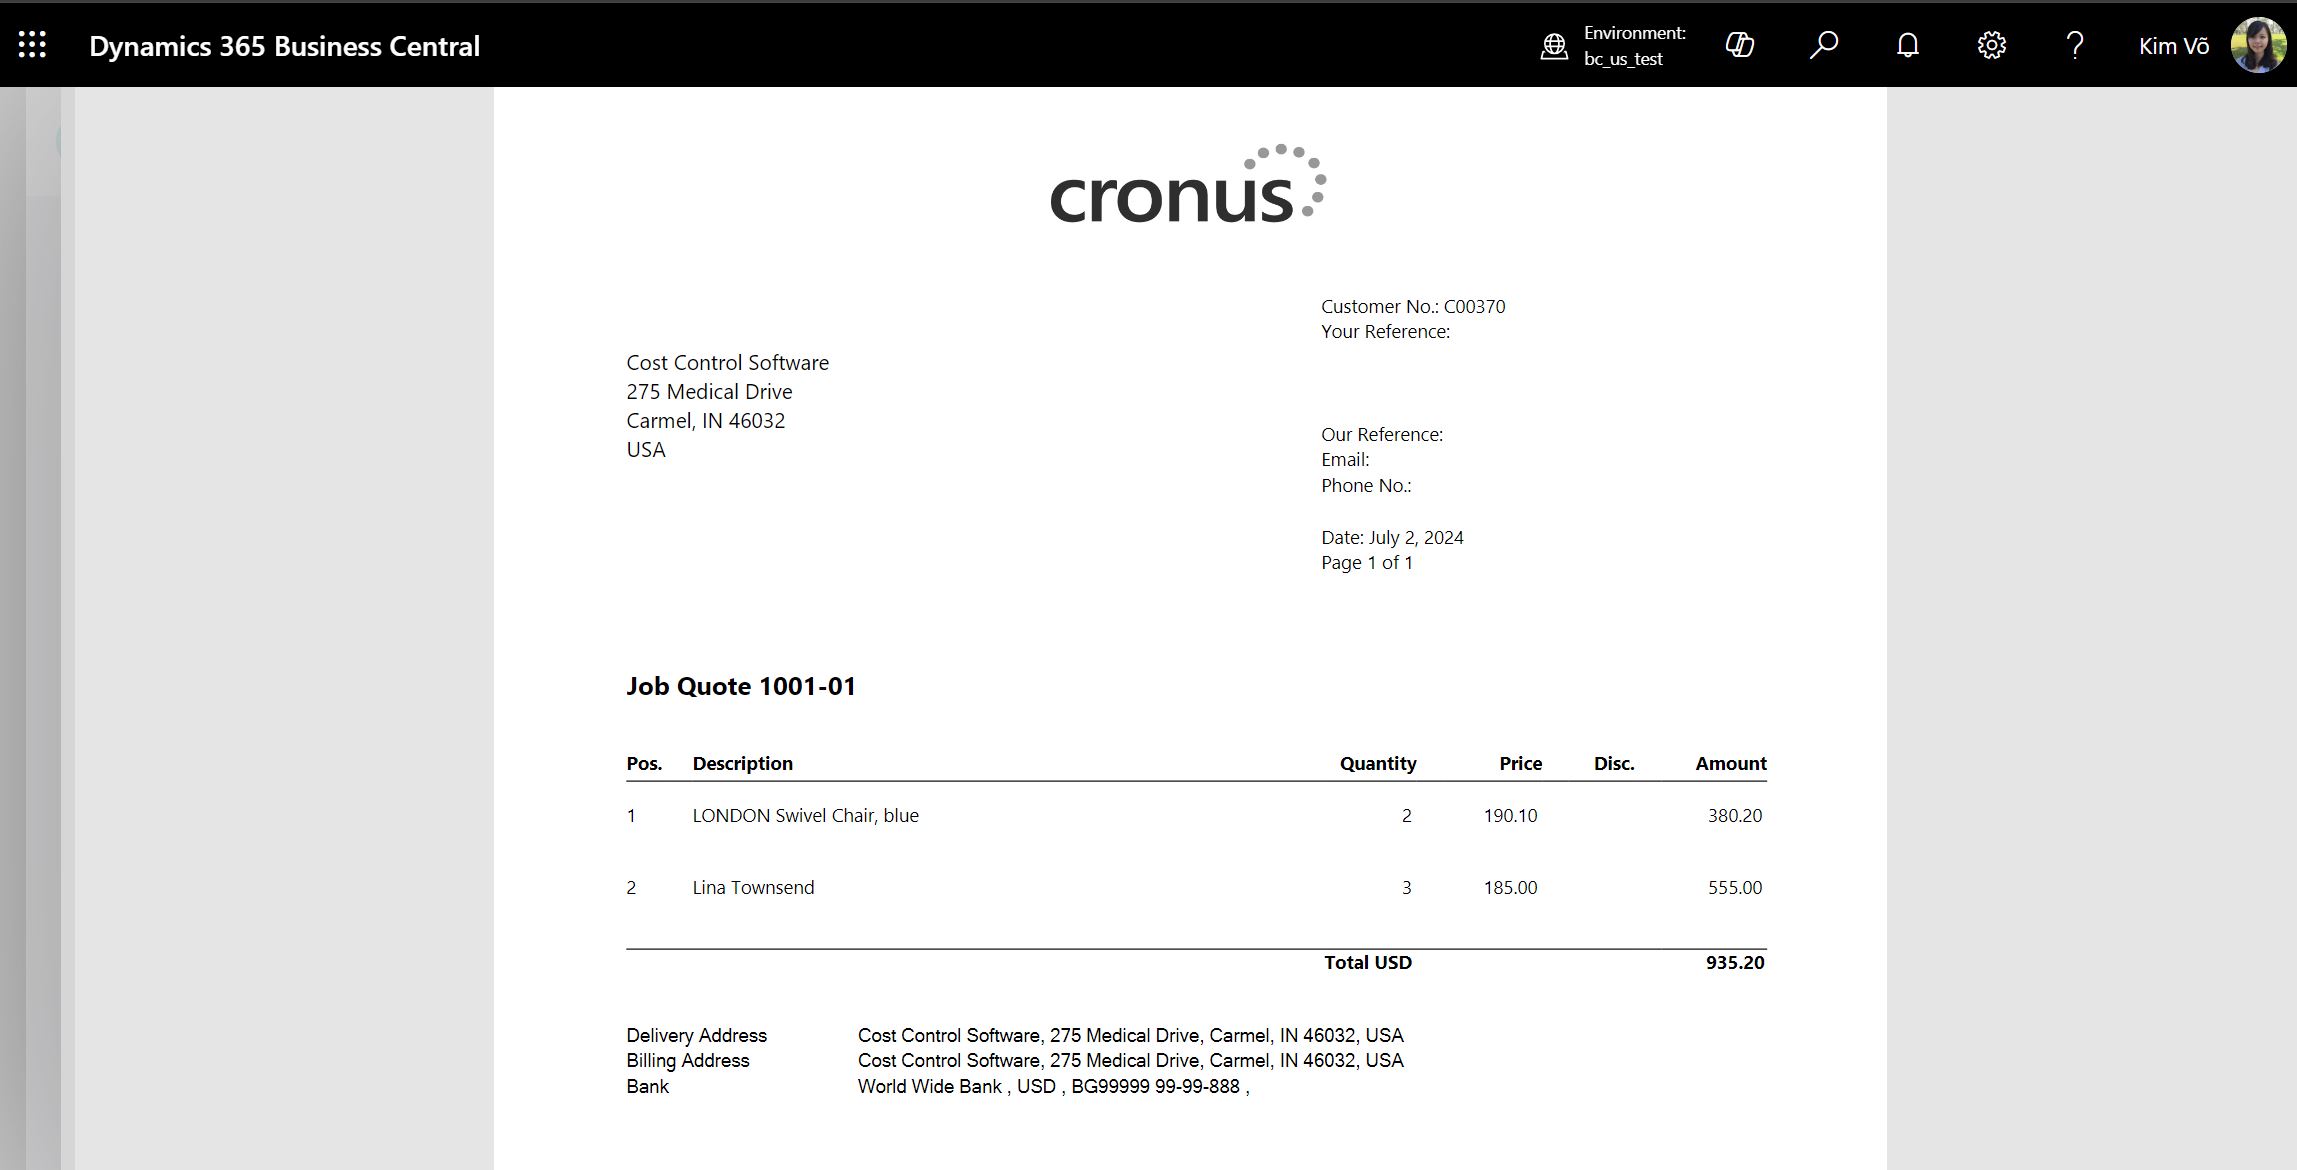
Print Quote
To print a Project Quote, on Project card, go to Print/Send, then choose Print Quote. The Quote layout can either be based on Job Tasks or based on Job Planning Lines.

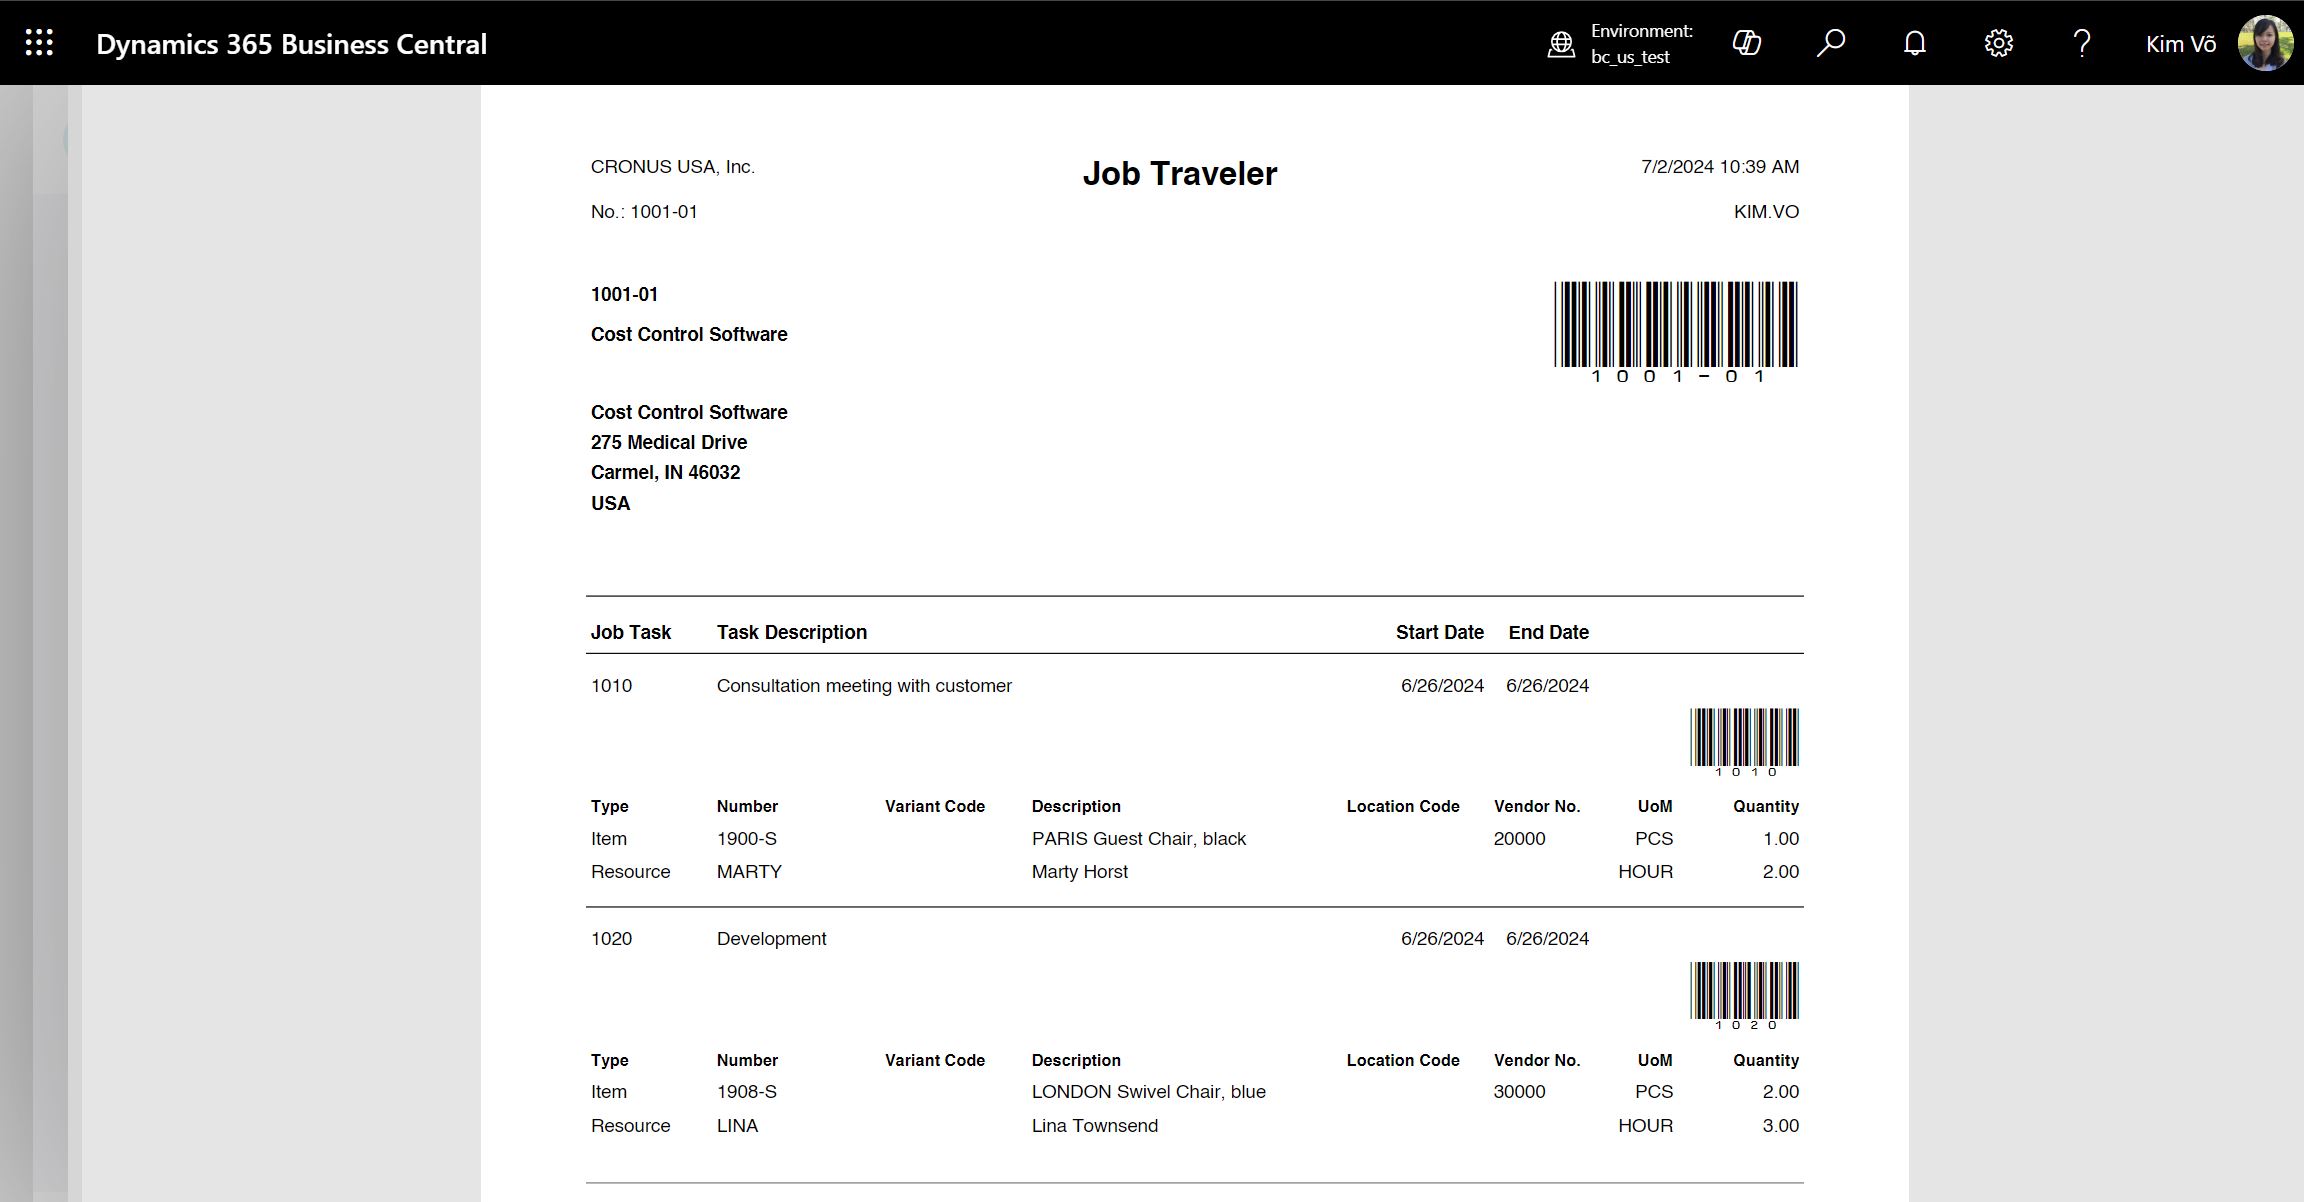
Print Project Traveler
A Job Traveler is an important report for the shop floor to see the details of a Project and to clock-in and out to Jobs and Job Tasks. It includes all relevant information for the Project and print comments. To preview or print Project Traveler, on Project card, go to Print/Send, then choose Print Project Traveler.

Manage Project
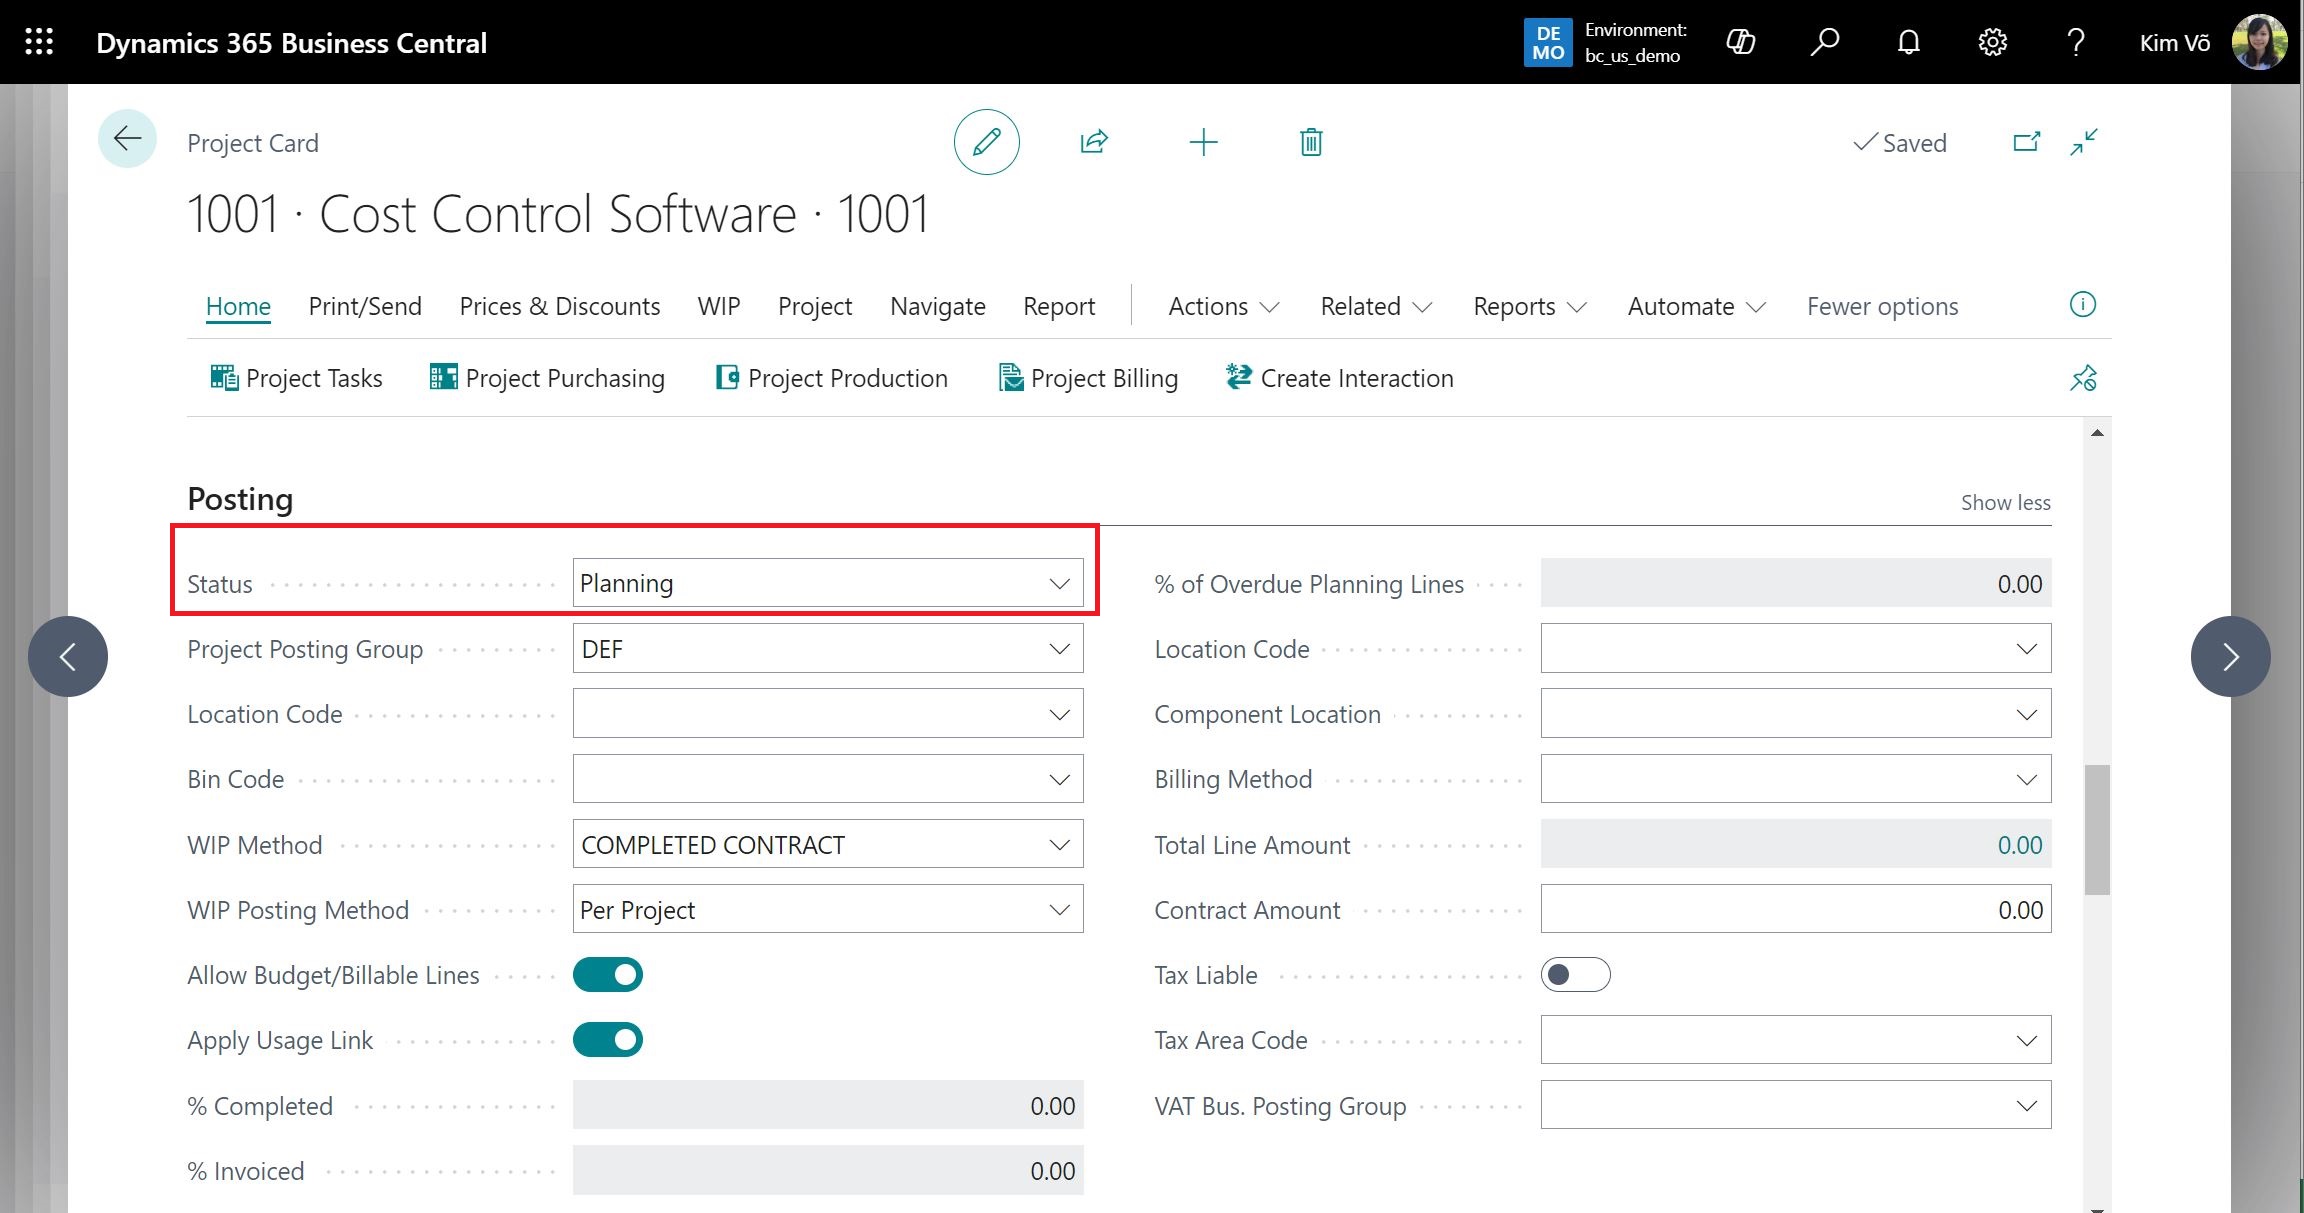
Change Status
By default, a newly created Project would have the same Status as you have set up the field Status Init Value in Project Manager Setup page. But you can change the Status on Project card to manage Project posting by going to Posting FastTab and select the following Status: Planning, Open, Quote or Completed.
Create Interaction
Change Master Project
You can change Master Project No. for a Project via a functionality on Project card: Actions -> Functions -> Change Master Project No.
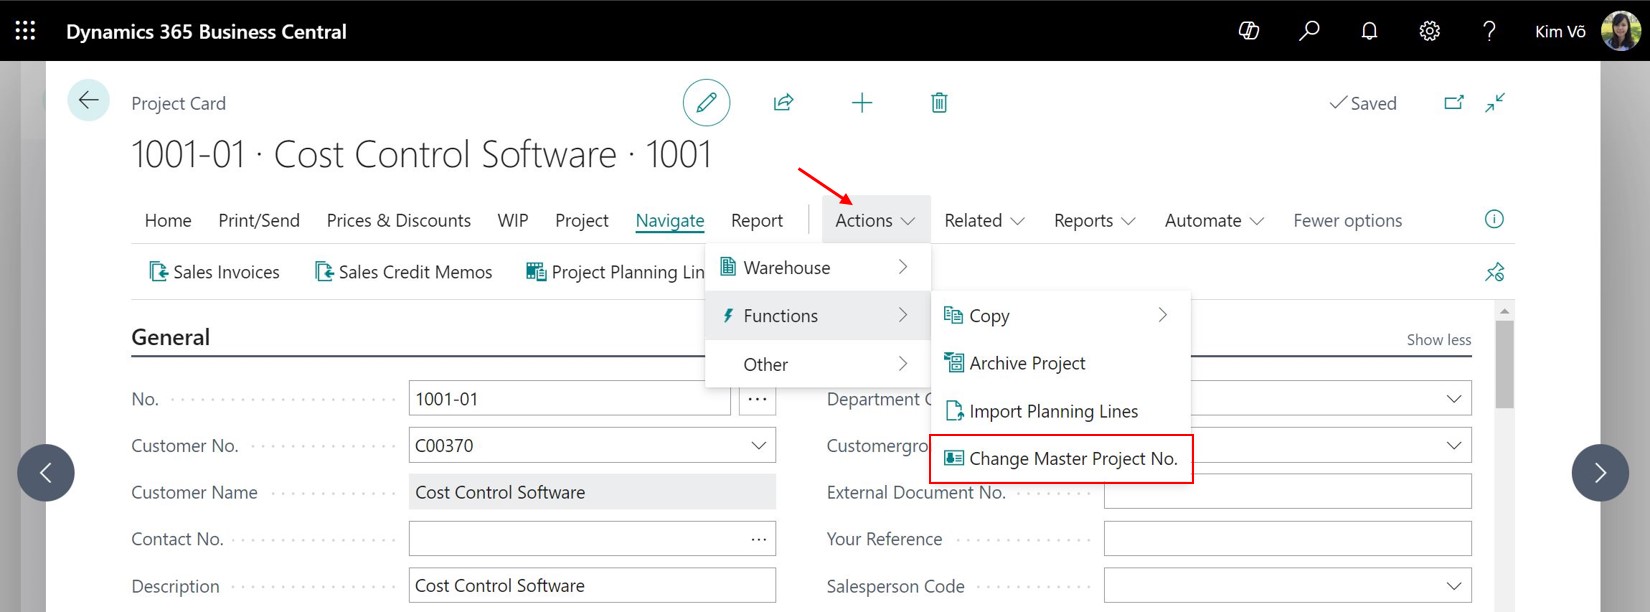
Then you can choose the New Master Project No. from the list and click OK.

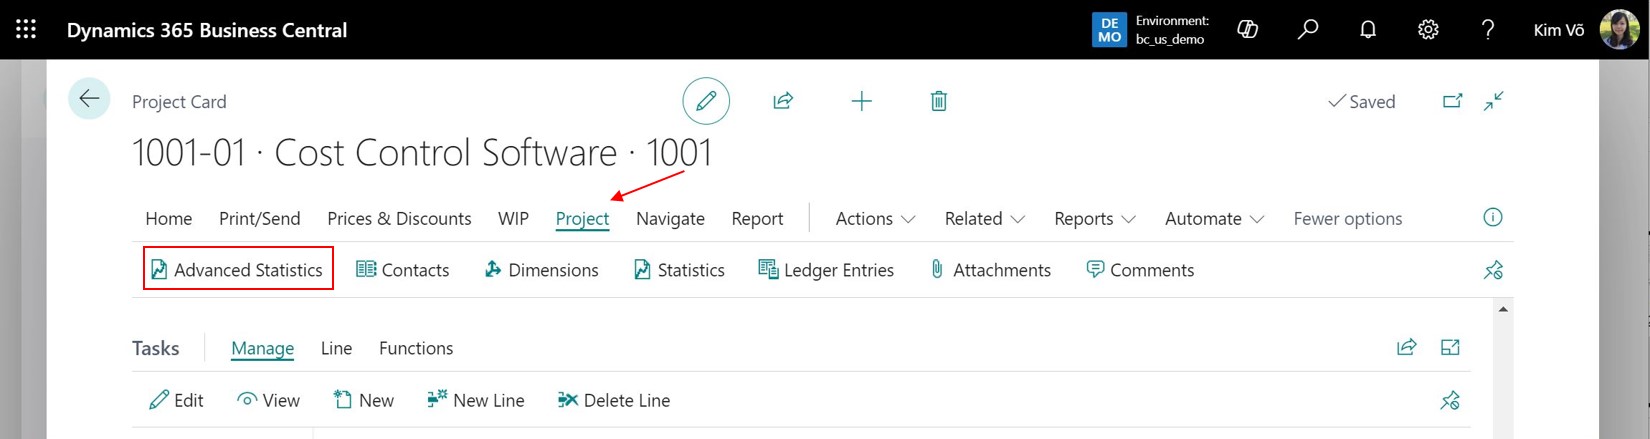
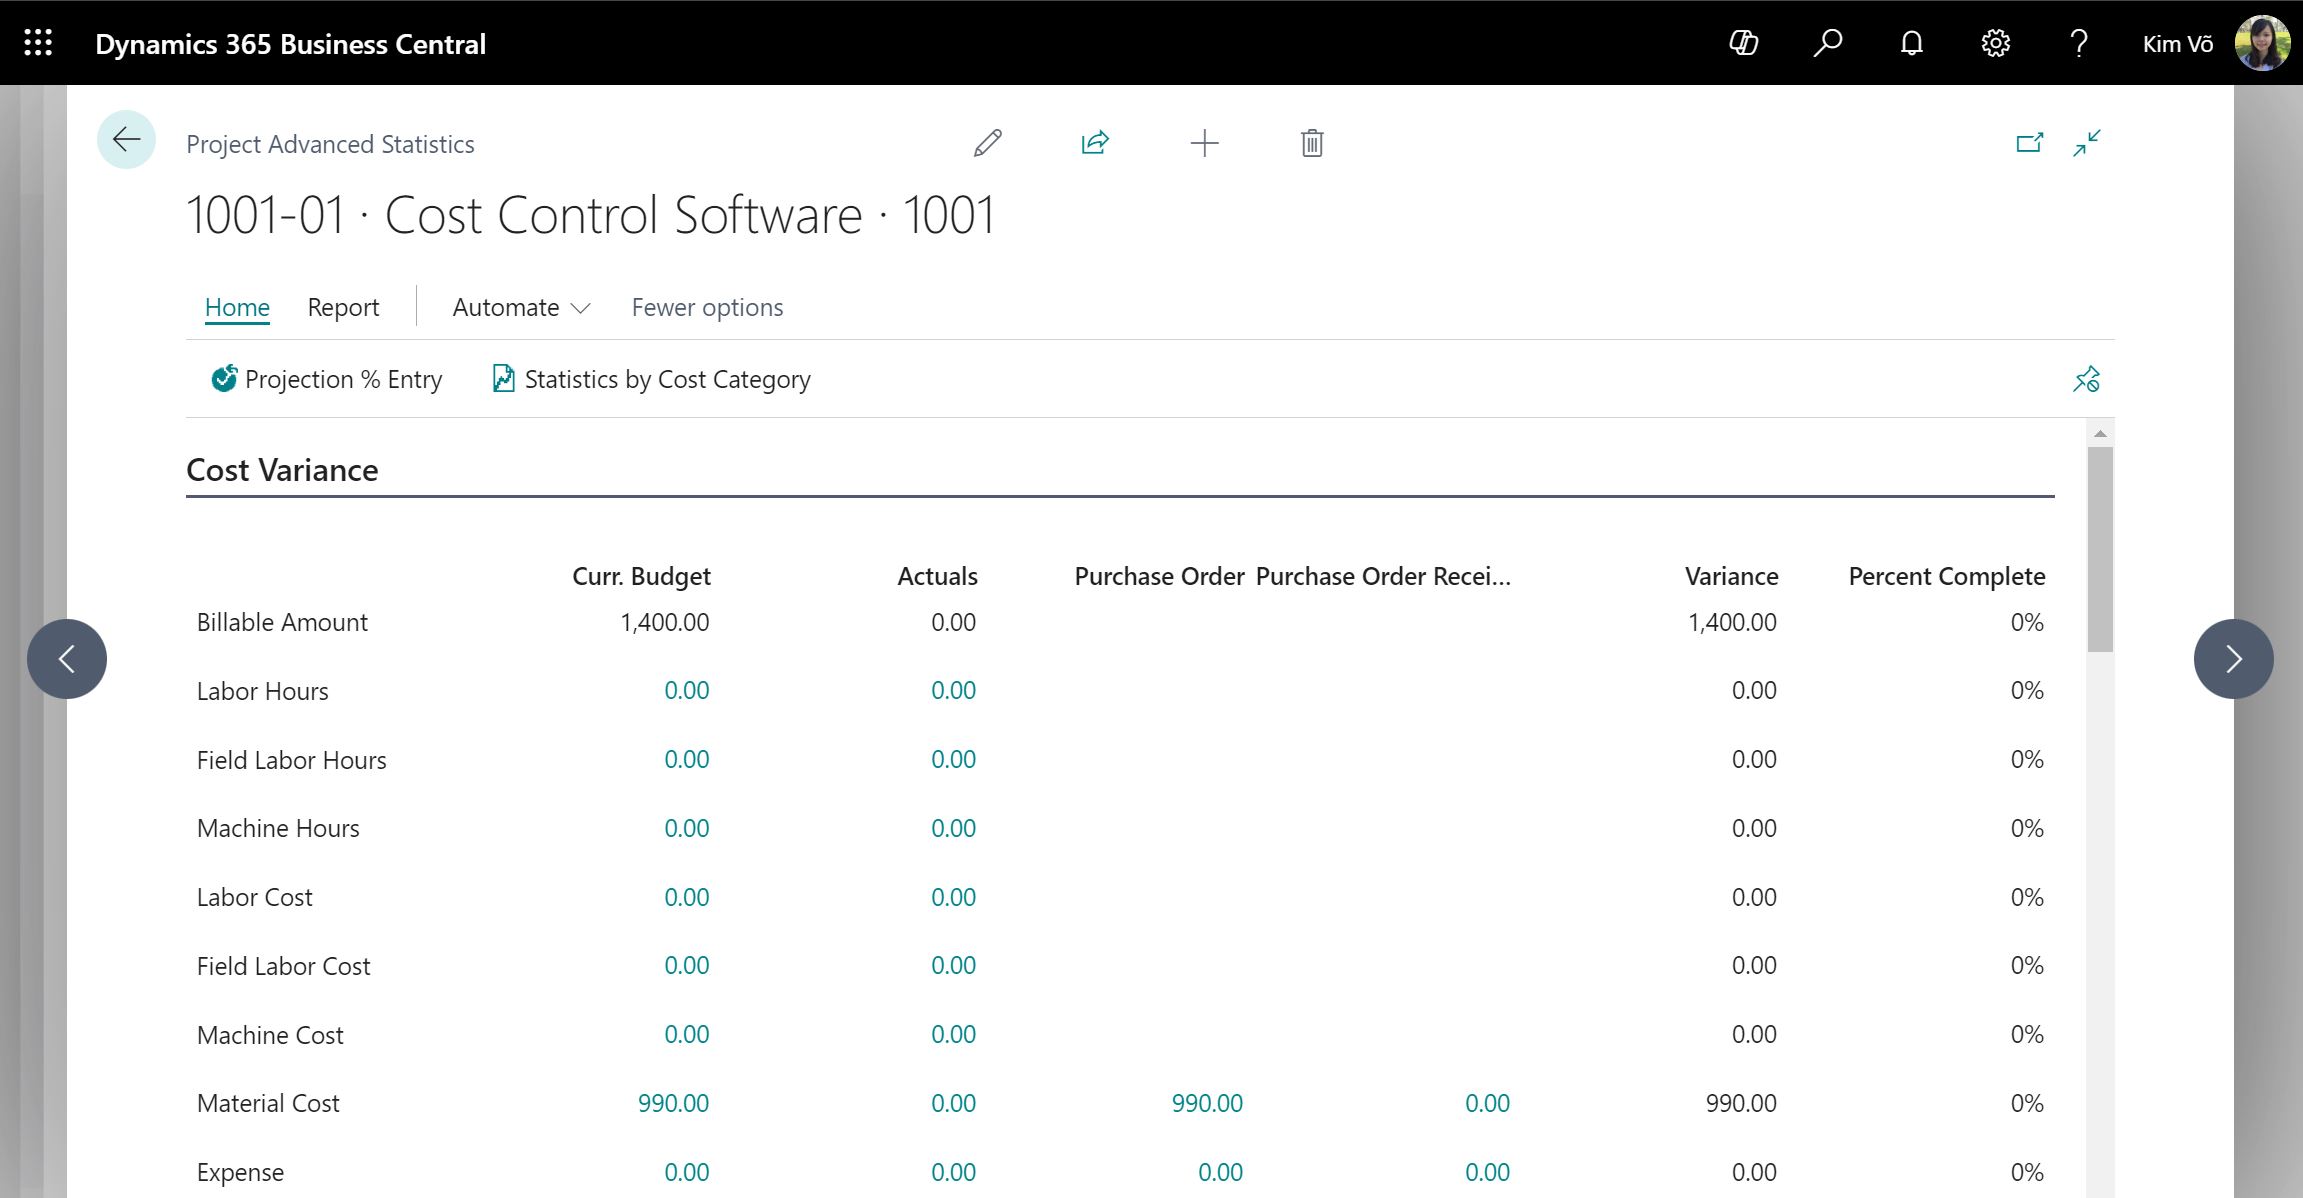
Advance Statistics
With Advanced Statistic view, users can track more Project figures and reports compared to the Statistic view such as: Cost Variance, Statistics by Cost Categories, print out Project Budget report or Project Audit report. On Project card: Project -> Advanced Statistics.
Project Purchasing
Project Manager Core adds functionality to the Project Planning Lines to make creation of Purchase Orders or posting item usage from inventory easier.
From the Project Card, go to Process, then choose Project Purchasing, it will allow a user to see all of the Budget lines (planning lines for items and resources to be used on the Project).

From this view, the user can use several options to post usage to the Project, either by ‘pushing’ the items to the Requisition Worksheet in order to create Purchase Orders, or by transferring inventory stock to the Project Journal and posting the usage.
The process of making a Purchase Order from Project: Fill Qty. to Requisition -> Create Requisition -> Open Requisition Worksheet.
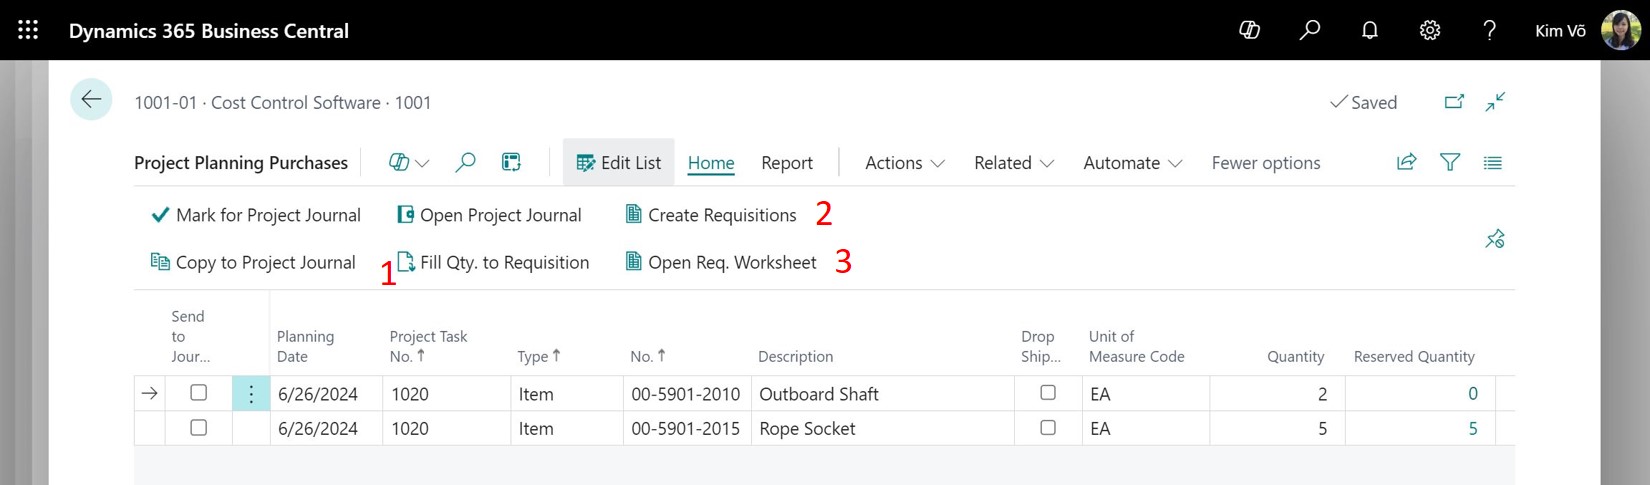
Fill Qty. to Requisition is a function that suggests the quantity to push to Purchase Order based on quantity on Planning lines.
Create Requisition allows the user to ‘push’ the items to the Requisition Worksheet for the selected lines, including quantities and the estimated cost, as well as the Project No. and Task No. So that when the Purchase Order is created, it is tied to the Project.
On the Requisition Worksheet, choose Carry Out Action Message and a Purchase Order would be created.
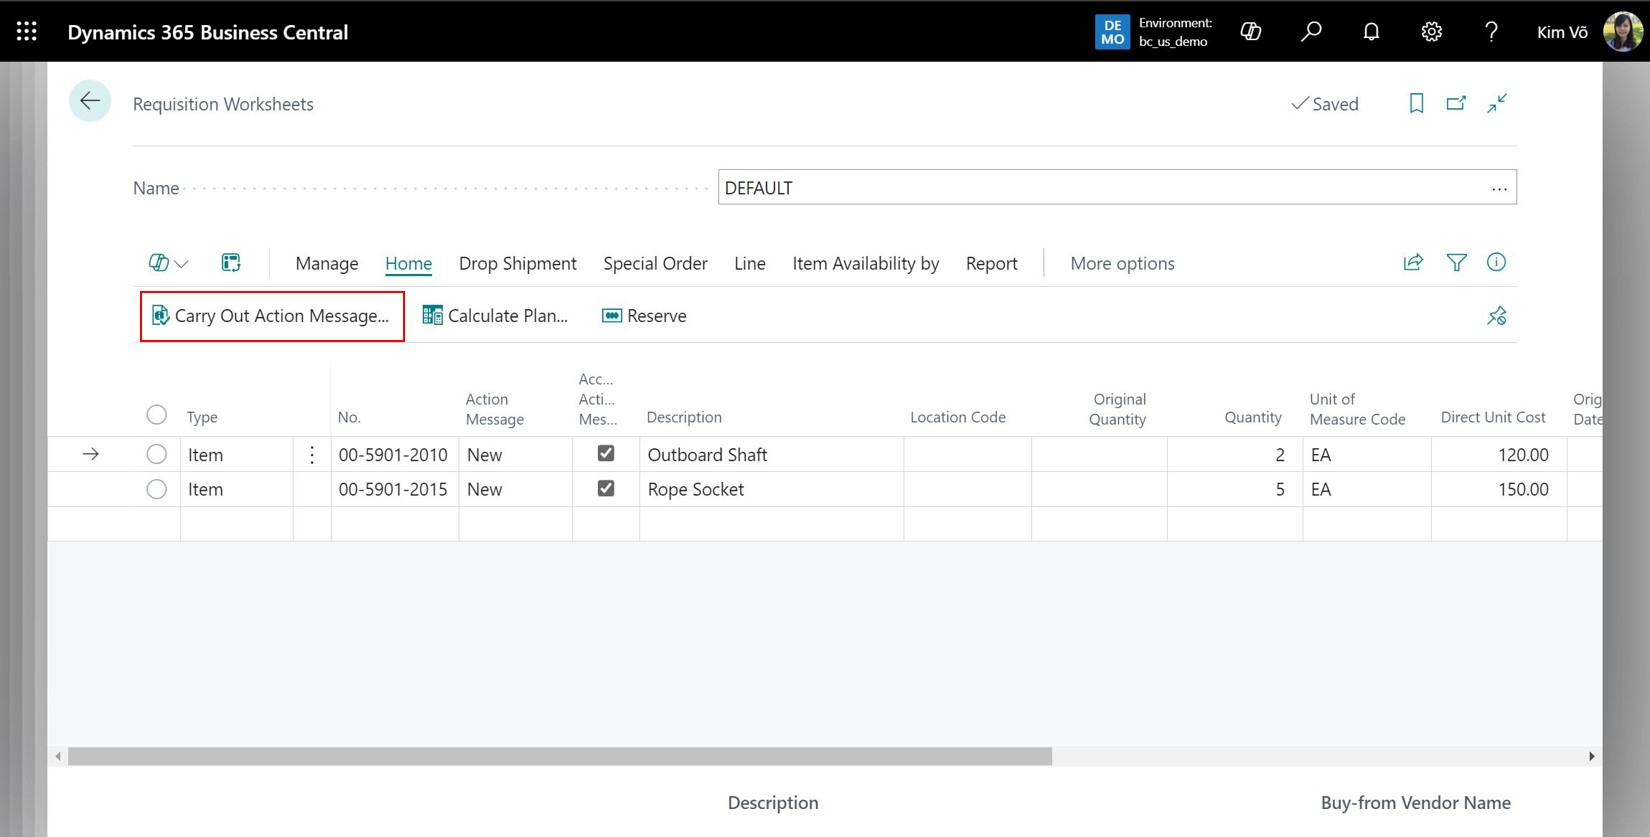
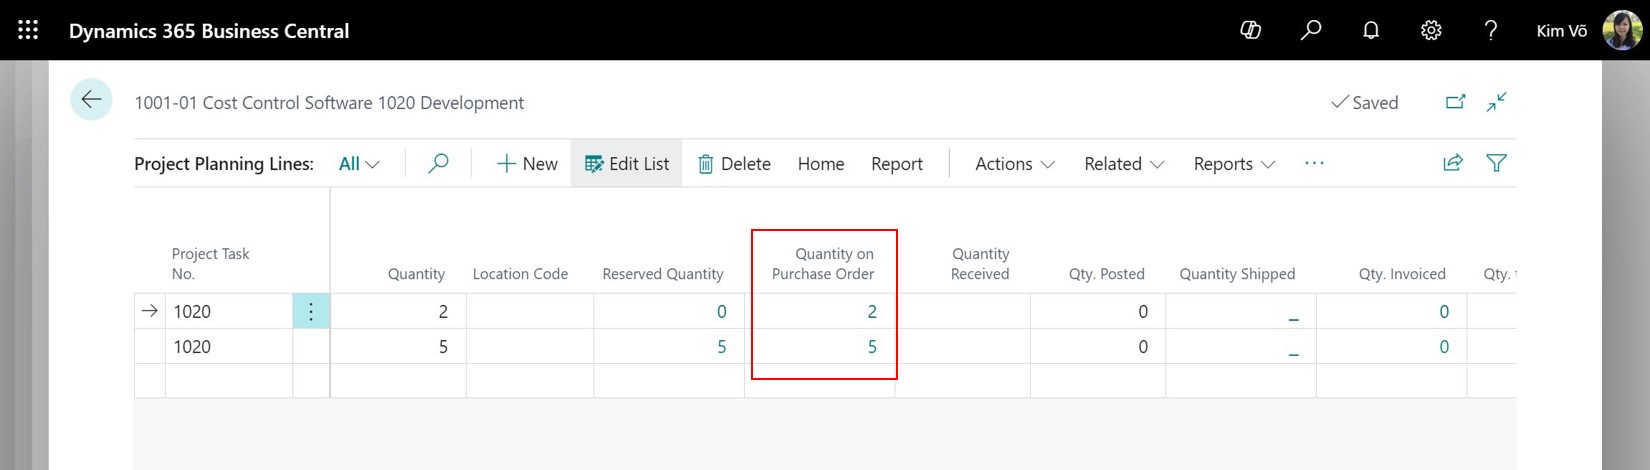
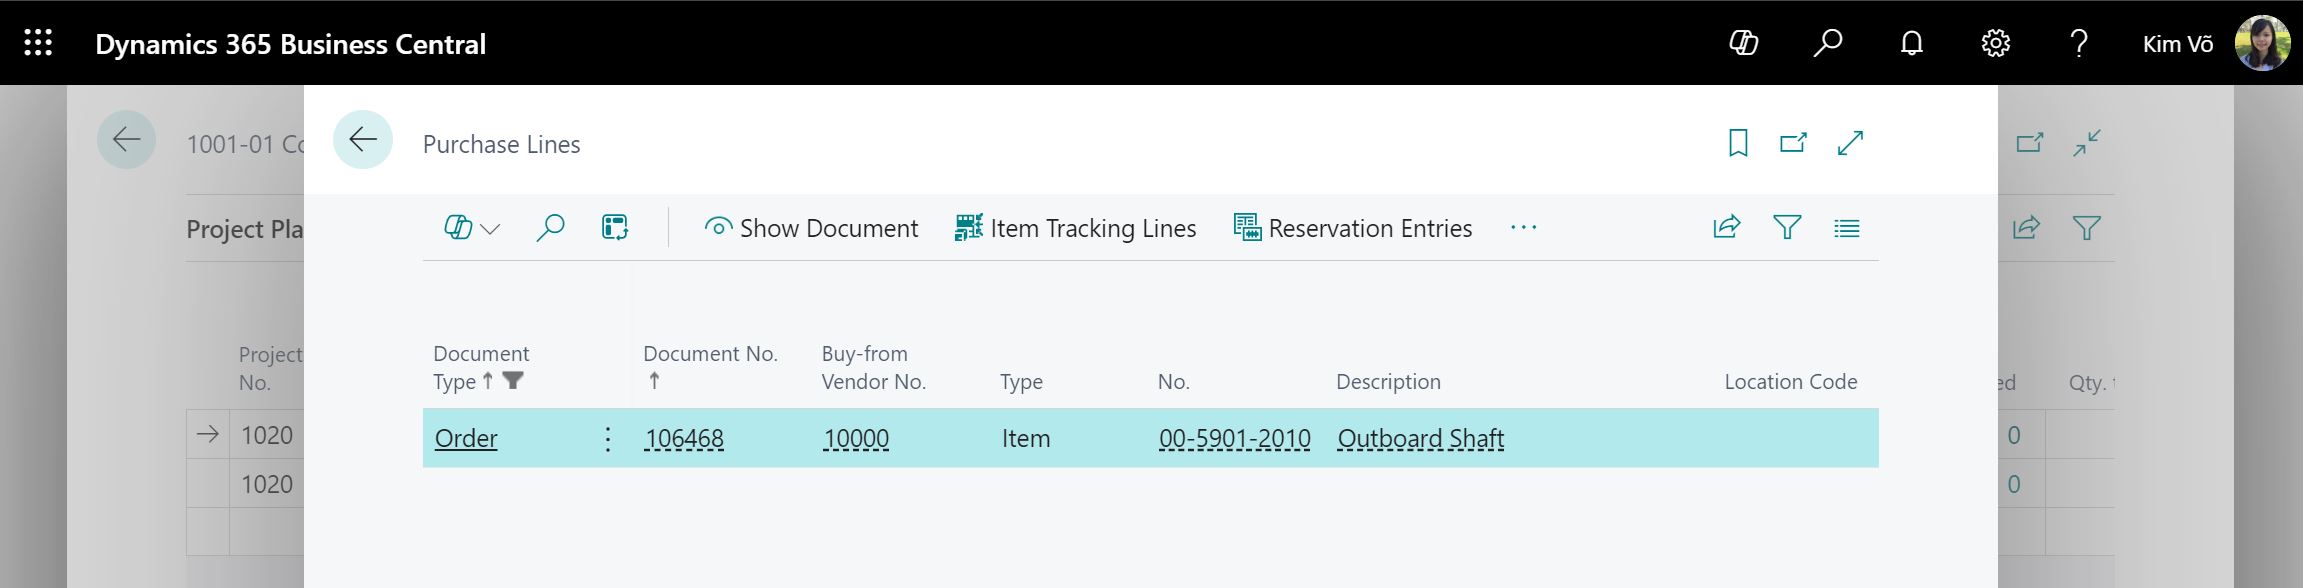
Once the PO is created, the Quantity on PO will also be transferred to the Project Planning Line. When you click on the Qty. on Purchase Order, you can see the Purchase Line as well as Purchase Order.
Project Production
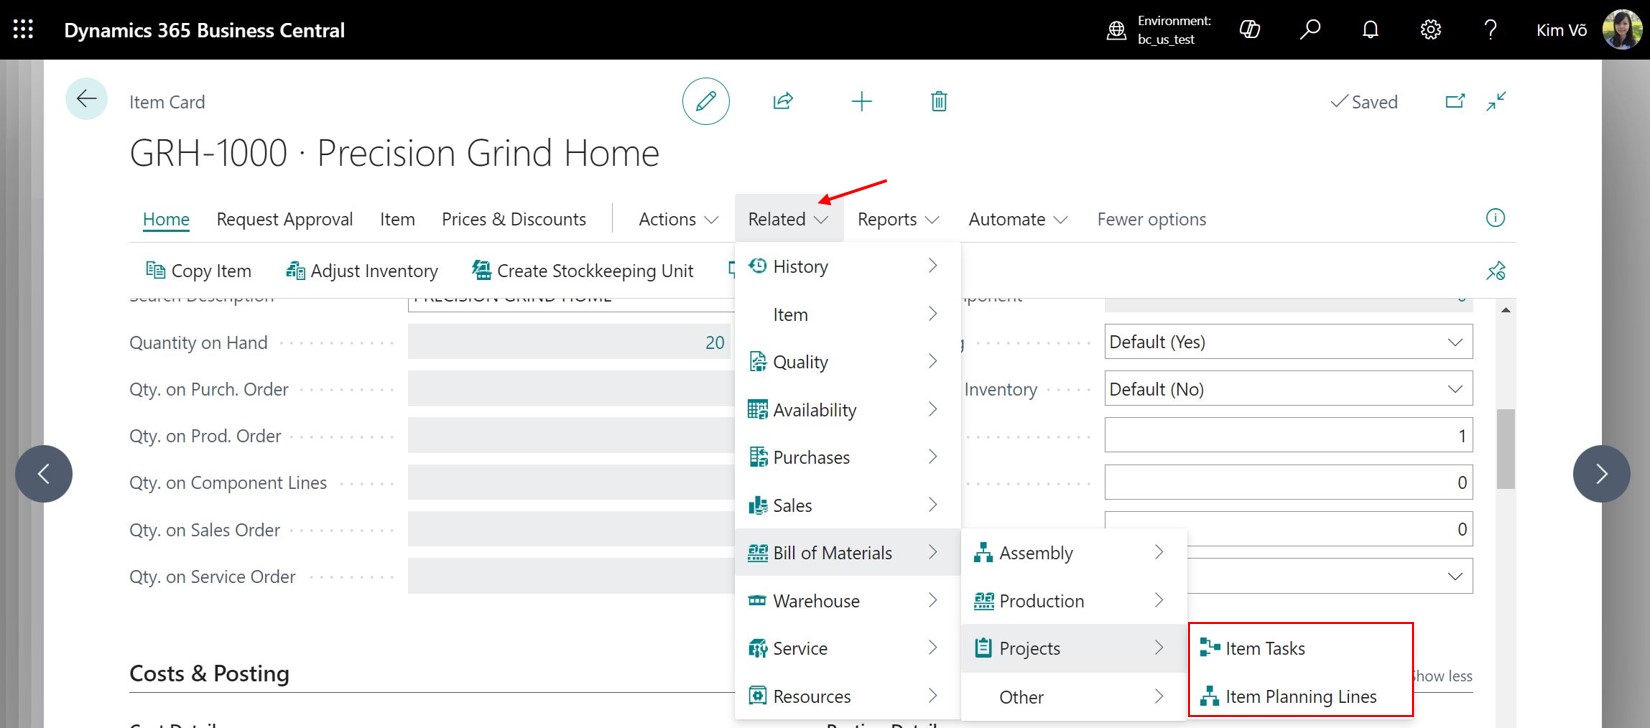
Project Production is designed for Projects with Type Item. To make it works more efficiently, for an Item that you want to use Projects in Production, you should first create Item Tasks and Item Planning Lines template on Item card: Related -> Bill of Material -> Projects -> Item Tasks. Then when you create a Project for that Item, the system will automatically transfer the Tasks and Planning Lines with corresponding Quantity to the Project.
On Project card, when you change a Project Type to Item Type, it will pop-up additional fields: Source No., Quantity and Finished Quantity. Here you can choose the Item and Quantity needed for Production. The system will then add the Tasks, Planning Lines and Quantities needed to produce the Items.

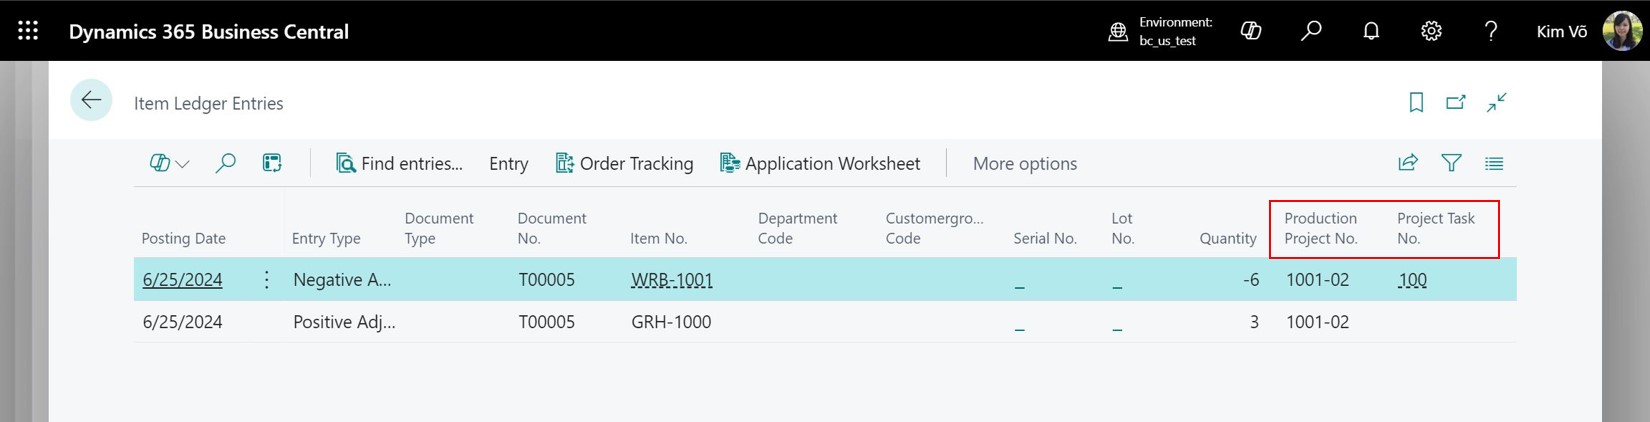
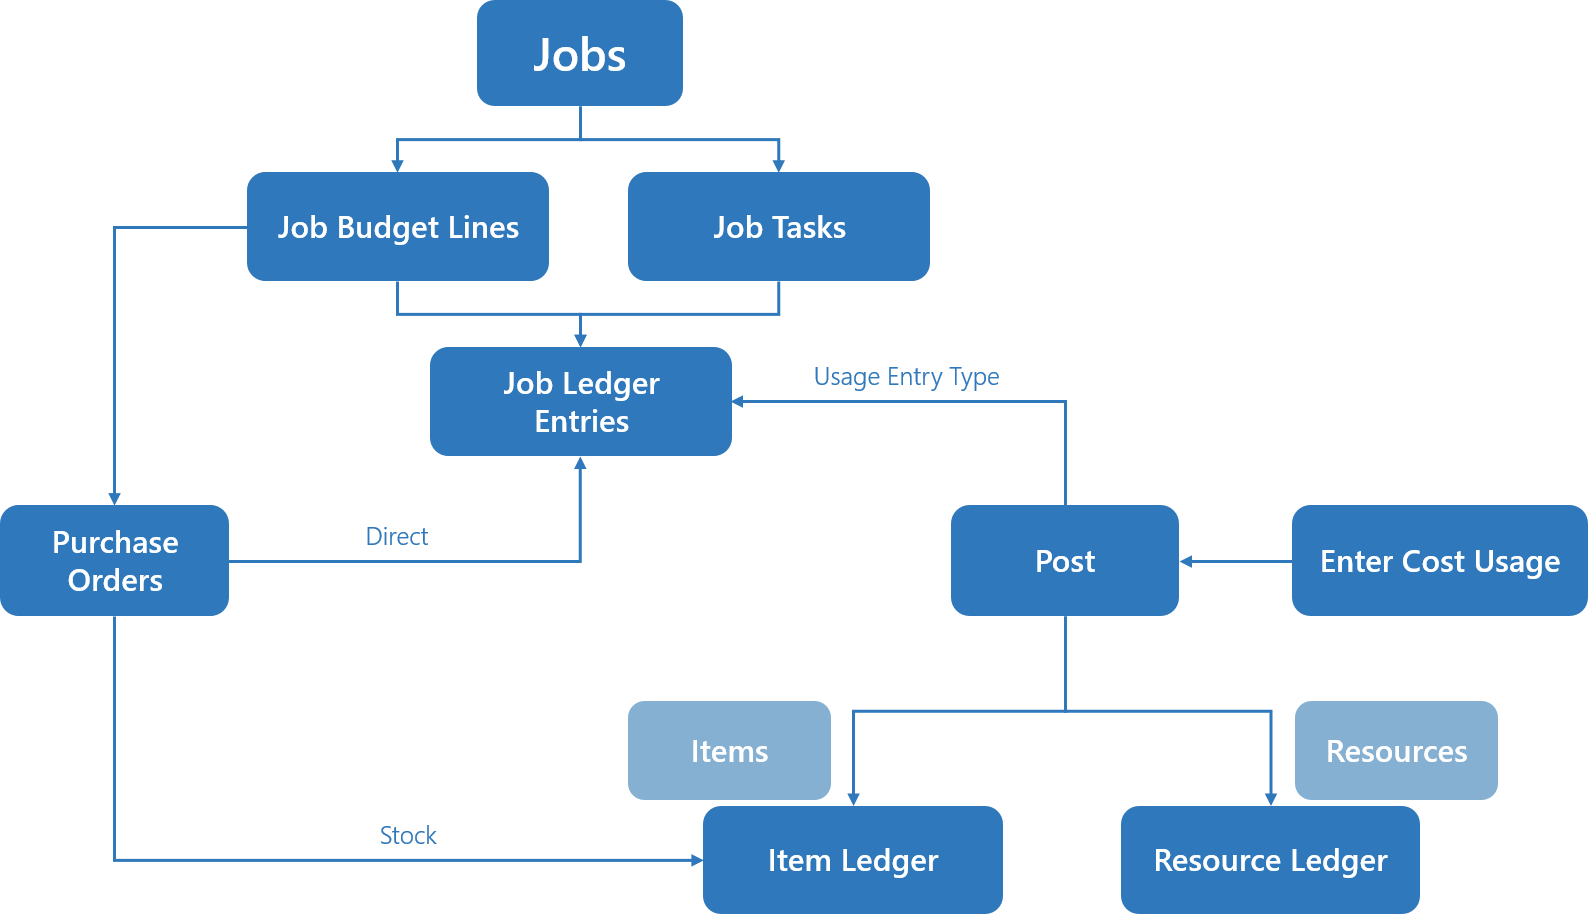
The main Item and Items used for production will also be transferred to Project Production Journal. On Project card: Home -> Project Production. Here you can Post the lines in the Journal as Item Ledger Entries that linked to the Project No. and Project Task No.