Quality Control

Application Description
Gain control and ensure a quality product every time. The basic goal of any quality software is to ensure that the products or services provided meet specific requirements and characteristics, such as being dependable, satisfactory, safe and fiscally sound.
Our Quality Control software provides a clear and straightforward way to test incoming raw materials and finished goods with lot or serial numbers. In-process testing for production orders is now available to give your business a complete end-to-end quality control solution.
Built directly in Microsoft Dynamics 365 Business Central to provide a seamless user experience, Quality Control offers the following features:
Features
- Supports all item related transaction types
- Define Quality Specifications with measures, methods
- Management of test requirements by item and transaction type
- Extension of Item Tracing with Quality Test for tested serial or lot numbers
- In-process testing based on a specification allocated to an operation in the routing
- Generate and print a Certificate of Analysis instantly for your customer
- All test results are stored in a testing results log for reporting or historical purposes
Benefits
- Quick and easy setup
- Complete end to end quality solution
- Directly built in Business Central, no interfaces necessary
- Ensure your finished goods meet the customer’s expectation
- Stop returns due to non-compliance to known specifications
Application Setup
All necessary settings can be defined from the Quality Control page. Choose the search icon, enter Quality Control Setup, and then choose the related link.
Quality Control Setup
In the Quality Control Setup the general settings for the application can be defined.

The following table shows the different options available in the General tab of the Quality Control Setup:
| Setting | Description | |
| Automatically create Quality Test | When this box is checked, when items are received it will create a Quality Test. | |
| Auto Test Line Comments | When Checked, Test Line Comments are created automatically when certain fields are edited. | |
| Default Value for Ignore | Default Value for the “Ignore” Field for newly-created Custom Test Lines. | |
| Only Quality Manager gets Non-Mandatory Tests |
When this box is checked, only the Users identified as Quality Manager will receive non-mandatory tests. | |
| Don’t update Routing Status | When this box is checked, the Routing Status will not be changed by the Quality Test. | |
| Create Quality Test per Item Tracking |
With this box checked, Quality Tests will be create per Item Tracking, otherwise only one Quality Test will be created. | |
Quality Measures
Setup your Quality Control Measures Descriptions. Quality Measures can have results recorded in two different ways as a Numeric value or a value defined as a List.

For instance the Quality Control Measure Appearance has a result list with possible results Good, Bad and Fair. When Non-Conformance is checked, the value does not pass the inspection. Only Good and Fair qualify for passing inspection.

Quality Methods
Quality Methods can be used to identify the way a measure should be tested. It can be a tool or a standard. Quality Methods are defined globally and can be selected on a Quality Specification.

Categories
Categories are used to classify tests. They are used to create views with predefined filters, for example by department, so a specific user only gets the Quality Tests from his own department.

User Setup
In the User Setup you can define user as Quality Control Manager. Any user can be defined as Quality Control Manager, for approvals if necessary. Only users flagged as Quality Manager can set Quality Test Status to Certified or Rejected. Users not flagged as Quality Manager can only set Quality Test Status to Ready for Review.

Application Workflow
This section describes the workflow of the Quality Control add-on.
Quality Specifications
Quality Control enables testing of Items during various processes within Microsoft Dynamics 365 Business Central. The rules of what needs to be tested for a particular item are defined in the Quality Specifications. Each item that needs to be tested, requires at least one Quality Specification.
Setup Quality Specifications
Before you can get started with Quality Tests, you need to define Quality Specifications for each Item to be tested. Choose the + Quality Specifications icon on the Quality Control RoleCenter or click on the New Specifications tile.
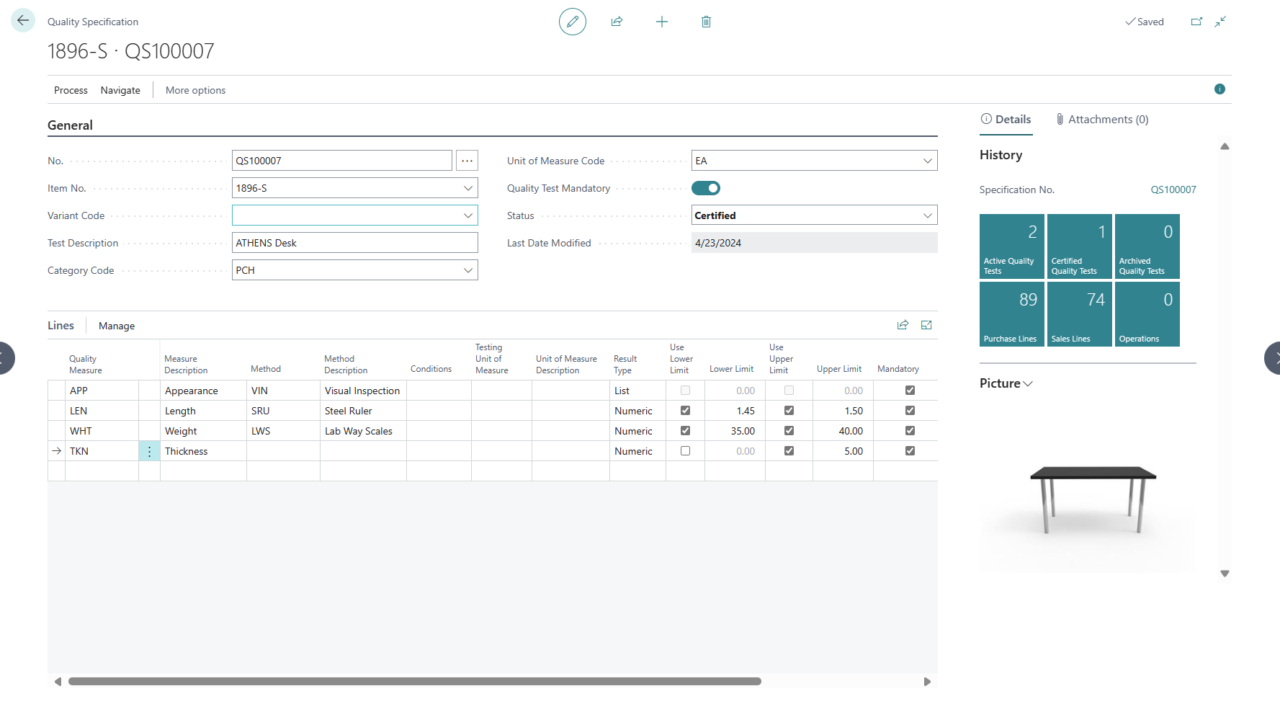
Select the Item No. to be tested and define the Category Code. Check Quality Test Mandatory, if testing is mandatory for this item. Enter the Quality Measures and Method to be tested and define the Lower and Upper Limit in which the test results should be in order to be compliant. If a result only has one target value, you can deactivate the other one. After the Quality Specification is ready, change it’s status to Certified in order to enable it.
Testing Requirements for Items
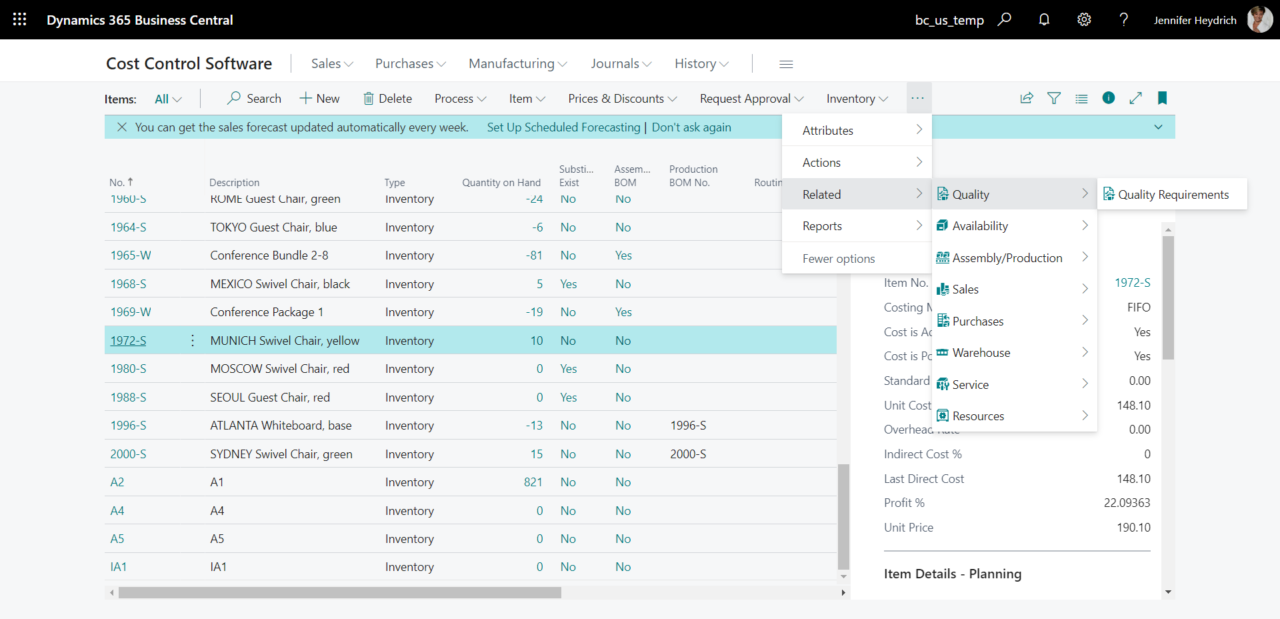
All Quality Tests that are related to Item Ledger Entries, can be defined using the Quality Requirement page. Select >Items in the Quality Control RoleCenter and choose the desired Item. On the Item List, select Related > Quality > Quality Requirements.
In the Item Quality Requirements page, you can define the Quality Specification for each transaction type. This allows you to define different specification for different types of transactions, for example when purchasing an item, different tests should be performed than when receiving it back from a customer return. Setup a Location Code, if you only want a Quality Test of an Item created for this special location. The Quality Test will be created automatically e.g. from a Purchase- or Transfer Order. In the Quality Test, the Quality Test Mandatory flag will be tagged, if you have choosen a Location Code you have set up in the Item Quality Requirements.

Testing Requirements for Routings
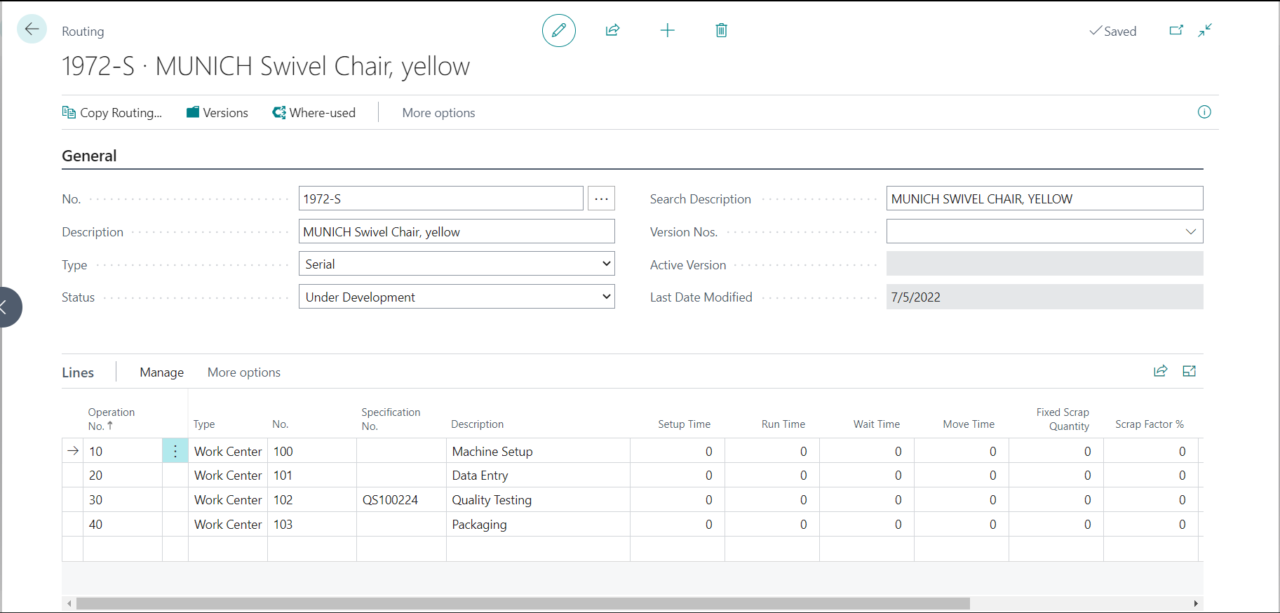
For in-process testing, the Quality Test becomes part of the Production Order. To automatically create a Quality Test from a production order, it needs to be added it’s Routing. To do so, select the Routing No. directly in the Item Card or enter Routings in the search bar. Create a new Routing or select an existing one.

Find an existing operation for Quality Testing or add a new one. In the Specification No. field, select the Quality Specification previously created.
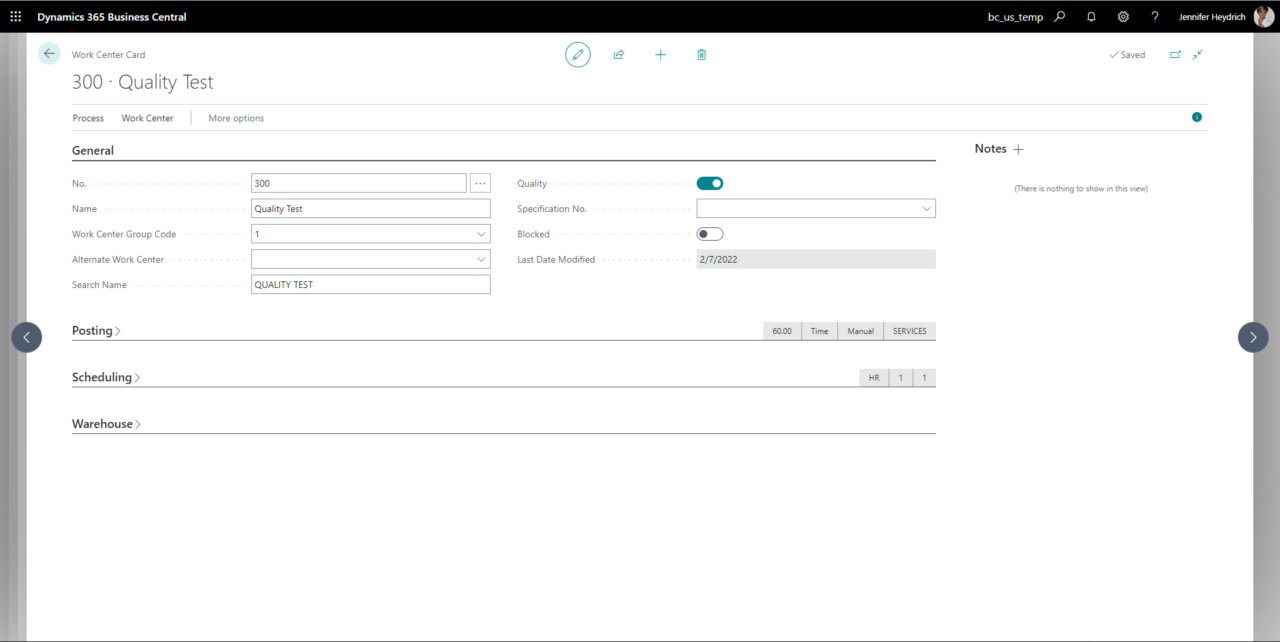
Each Work Center used for Quality Testing must be flagged as Quality in the Work Center Card. It is also possible to set a specification as default on the Work Center, but not mandatory.
Quality Testing
The Quality Test will be used to record the measures of an item and is being created based on the assigned specification.
Create Quality Test
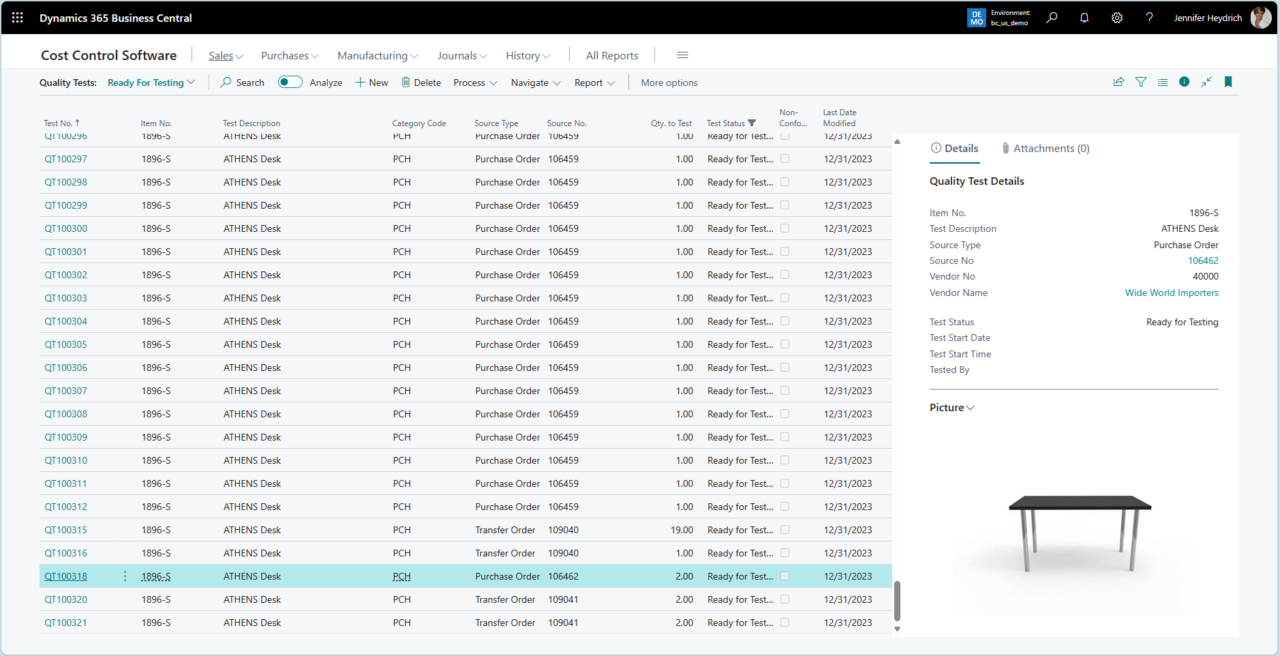
For each process and item that requires quality testing, the system automatically blocks the posted Serial or Lot No. and creates a new Quality Test automatically. Each new Quality Test will have the status Ready for Testing. To see a list of test that are ready for testing, you can chose the respective icon in the RoleCenter.
Perform Quality Test
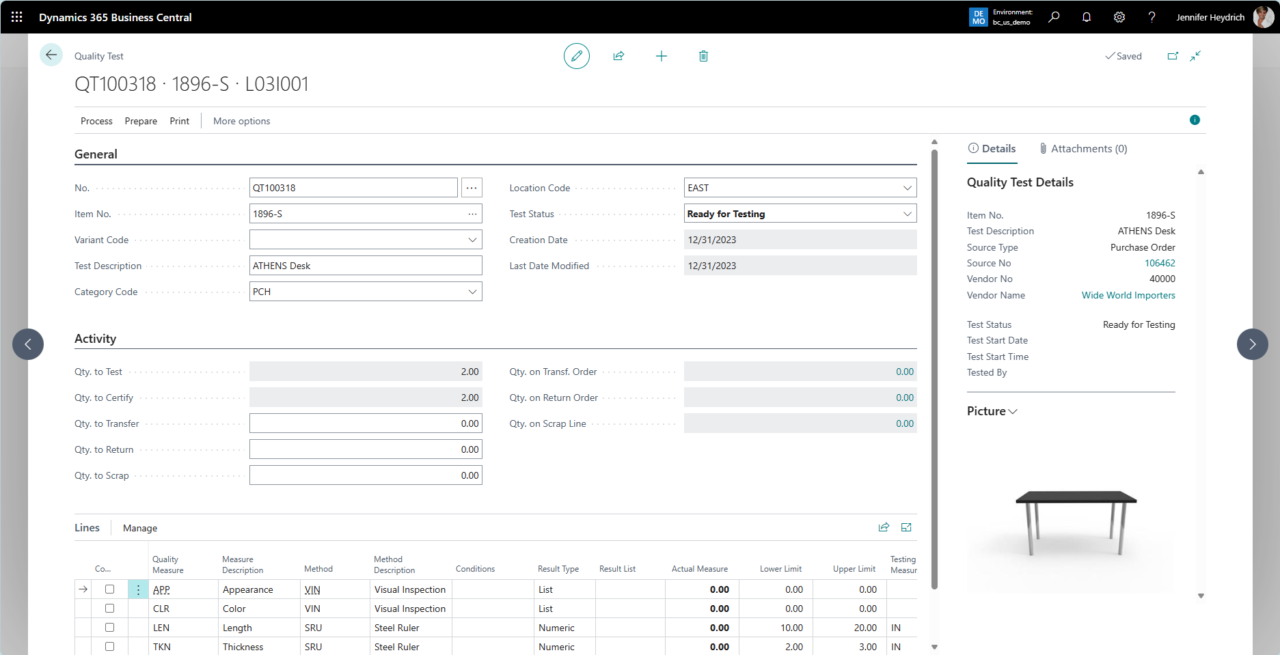
Open the desired Quality Test that has been created automatically.

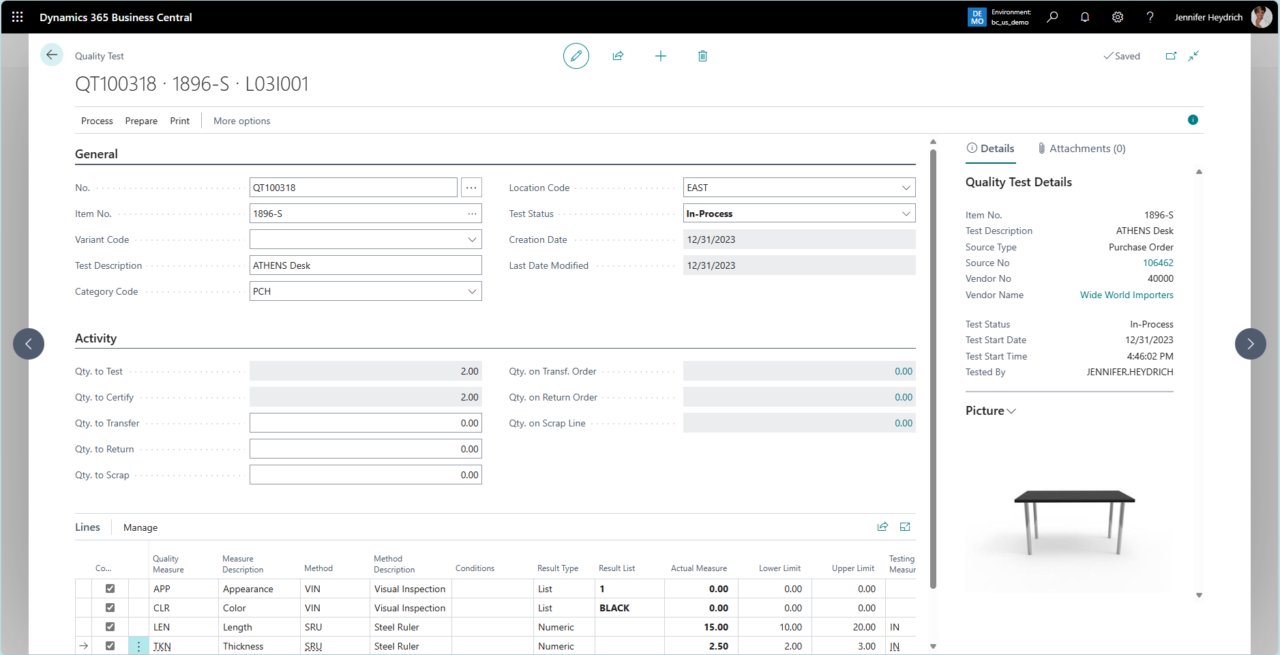
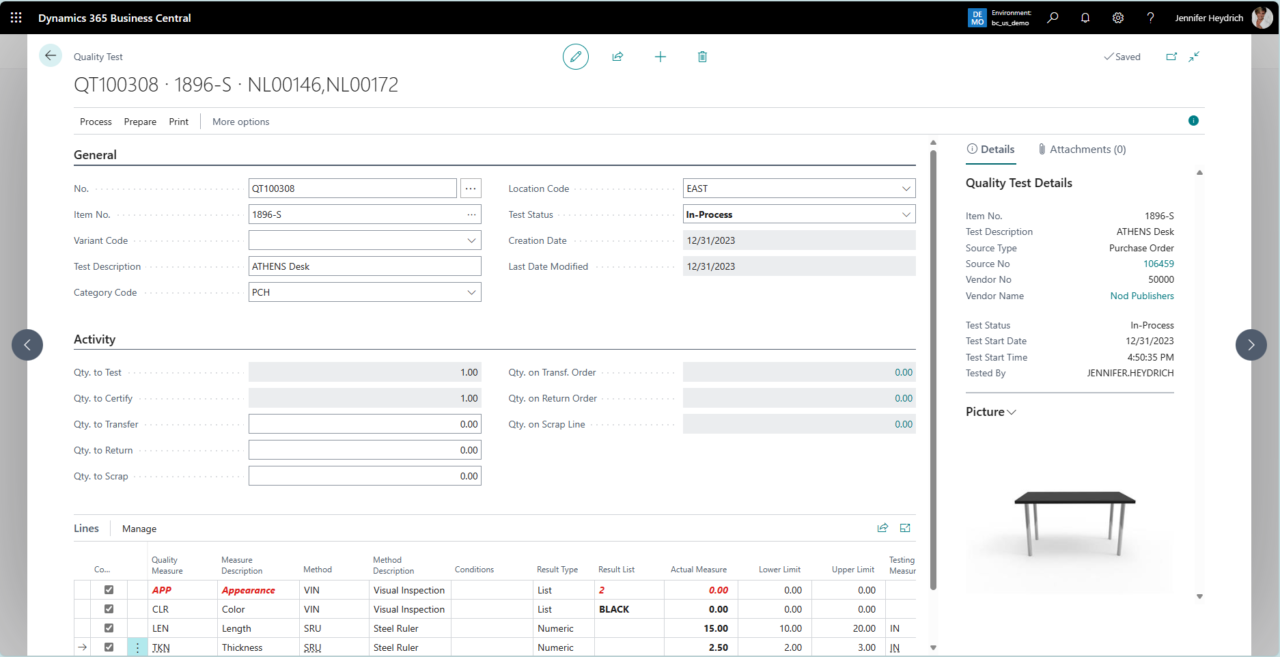
Enter test results in the columns Actual Measures or Result List depending on its type. Test Status will be set to In-Process automatically, as soon as you start to enter the results. Once the test results are entered, the line will be marked as completed.
Notice that any test results that are outside of the limits established will automatically be flagged as Non-Conformance and highlighted in red. After completing the test, the status can be changed to Certified or Rejected provided the user is defined as Quality Manager. All other users without this permission, can set the status to Ready for Review, so it can be reviewed by a quality manager.
The following table shows the different Status a Quality Test can have:
| Status | Description |
| Ready for Testing | A Quality Test has been created and is ready for testing. |
| In-Process | The test is currently being processed. |
| Ready for Review | The test has been completed and is ready for review by a Quality Manager. |
| Certified
Certified with Waiver Certified Final |
The test has been completed and approved. Any of the Certified status will mark the Quality Test as passed and the Lot or Serial No. will be unblocked. |
| Rejected | The Quality Test did not pass and the Lot or Serial No. will not be unblocked. |
| Closed | A Certified Quality Test can be archived with the status Closed. |
Activity
If you need to make changes in your Quality Test such as Transfer, Return or Reject, fill in the quantity in the related field and then click on Prepare. You can now select and generate the associated document.
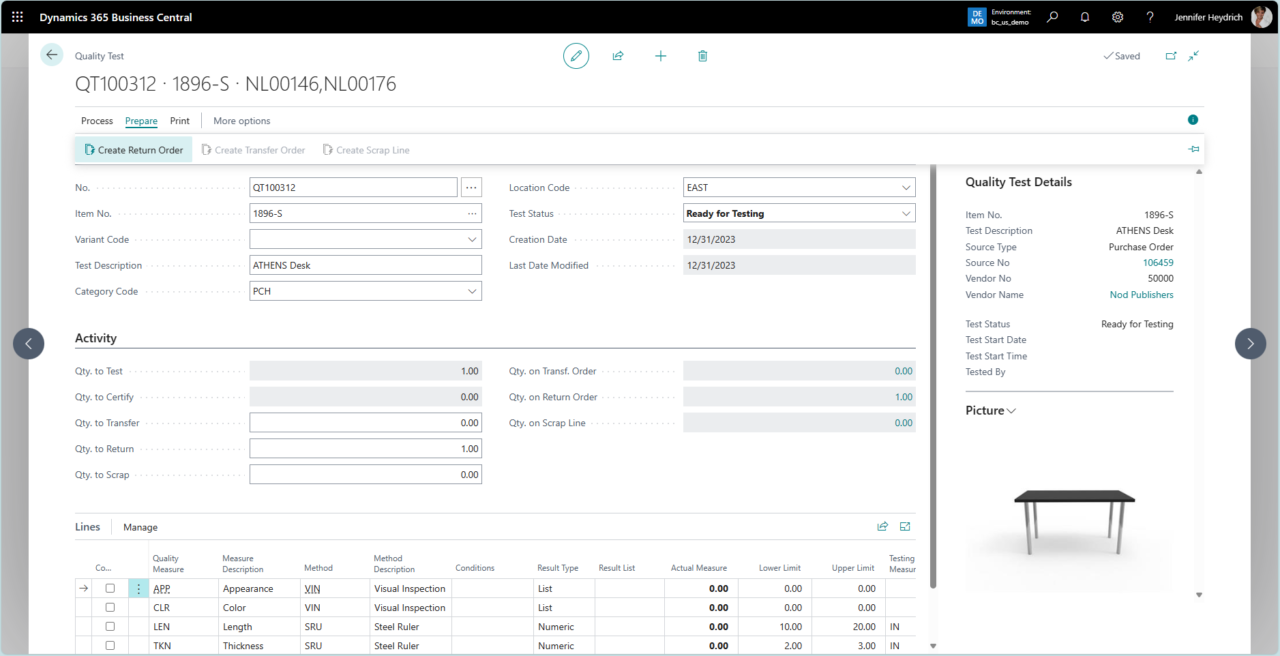
The following table describes the different Document Types:
| Status | Description |
| Create Return Order | Return Order is created for the selected quantity. |
| Create Transfer Order | Transfer Order for relocation to another warehouse or location is created. |
| Create Scrap Line | A line with negative adjustment is created for the item in the item journal. |
Item Quantity
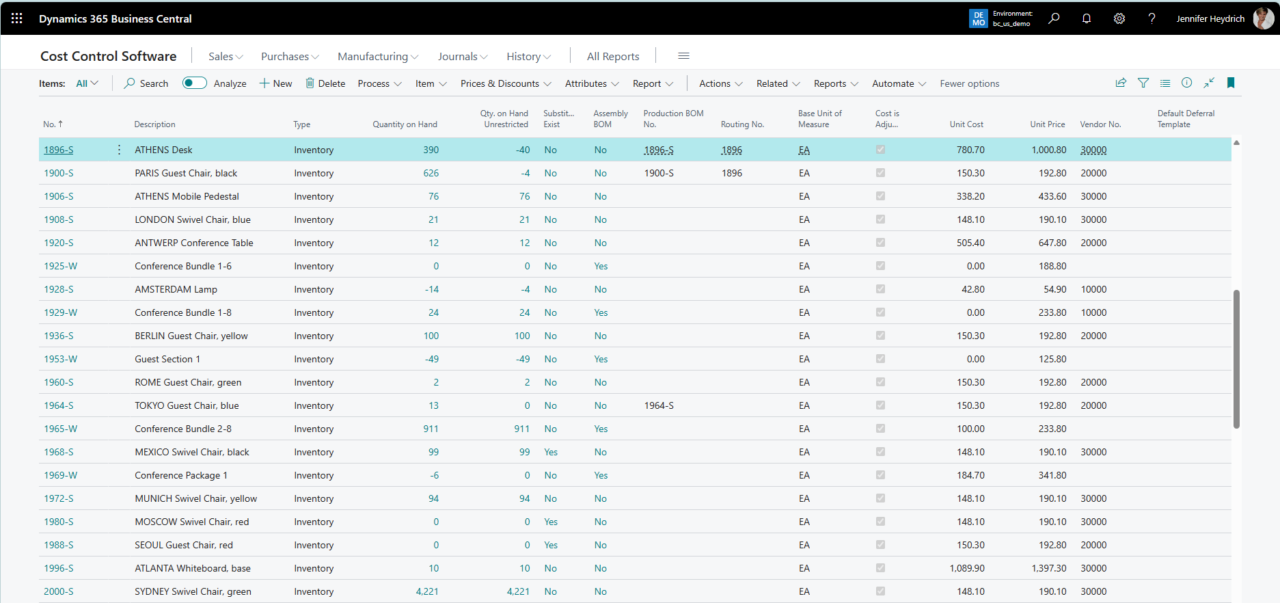
As soon as an Purchase Order, Sales Order, etc. has been received, the Quantity on Hand is adjusted accordingly. When the items have been certified in the related Quality Test, the quantity is added to Qty. on Hand Unrestricted and the value is adjusted.
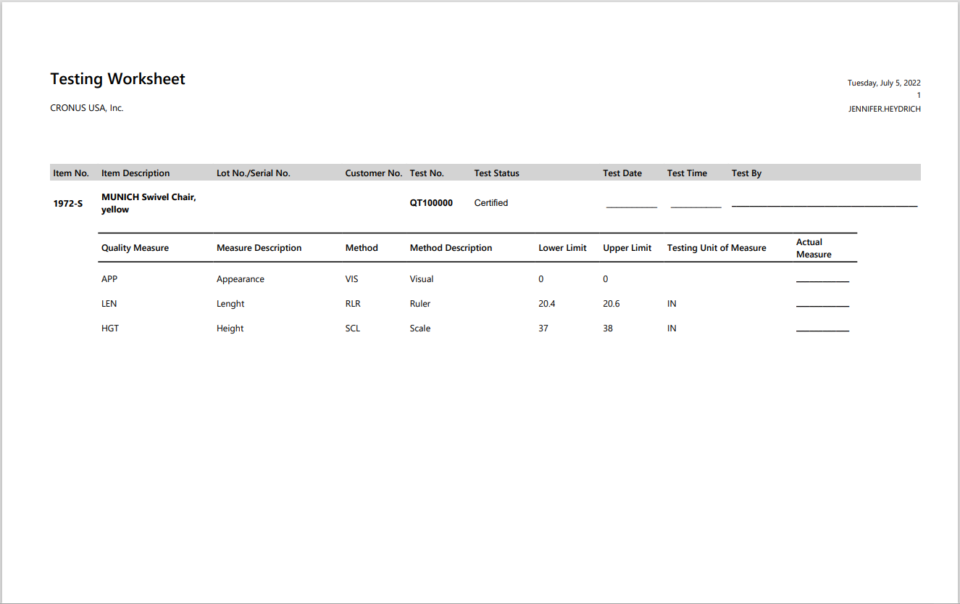
Testing Worksheet
The Testing Worksheet can be used as an instruction for the tester on the floor. The tester can write down the test results to be entered in the system. To generate a Testing Worksheet, click on Print > Testing Worksheet. Put this report on your clip board and go get the test results.
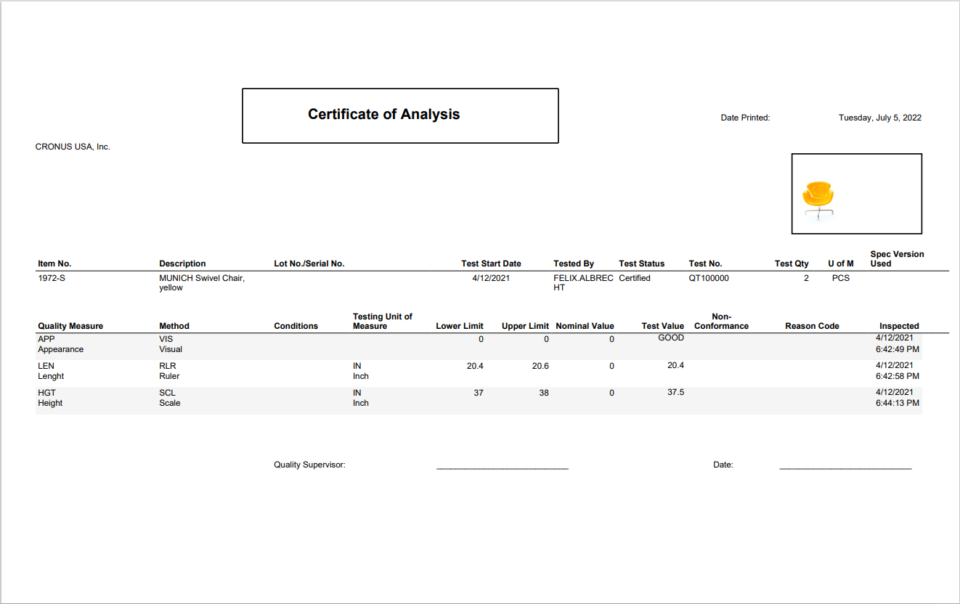
Certificate of Analysis
To generate a Certificate of Analysis, click >Print>Certificate of Analysis. A Certificate of Analysis can be generated after the test is certified.
Quality Reporting
Quality Control is built around the Item Tracking Granule. Item Tracking enables Lot Number Tracking on either Finished Goods or Raw Materials. (Purchased Items or Produced Items)
Lot No. Information
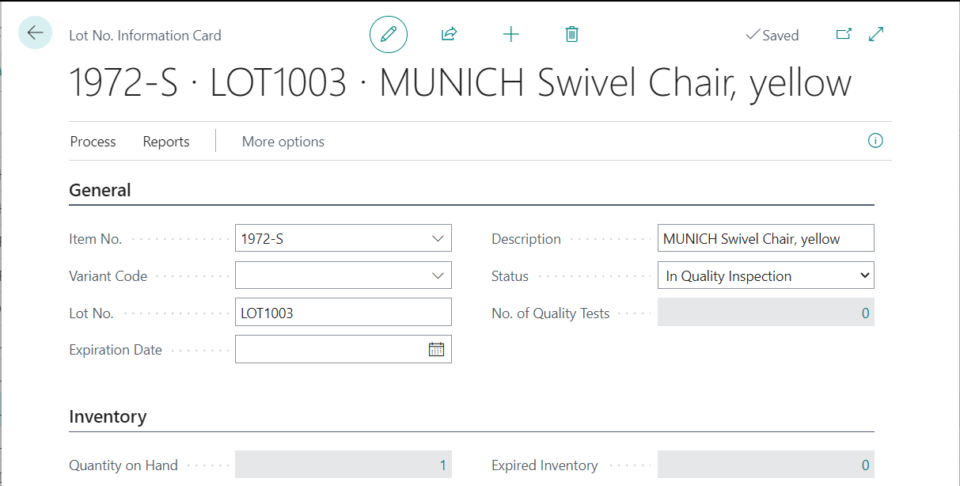
Once a Quality Test is created, an entry is made automatically for the relevant Lot No. Create a new entry by selecting + New, or edit an existing entry by selecting the desired Item No.

This will open the Lot No. Information Card. Here you can find the Lot No. Status: Unrestricted, In Quality Inspection, Restricted or Blocked. The Status will be updated automatically once the associated Quality Test is set to Certified, Rejected or Closed. Note: If the Quality Test Status is Rejected, the Lot No. will be blocked.
Serial No. Information
Once a Quality Test is created for an Item with Item Tracking, an entry is made automatically for the relevant Serial No.

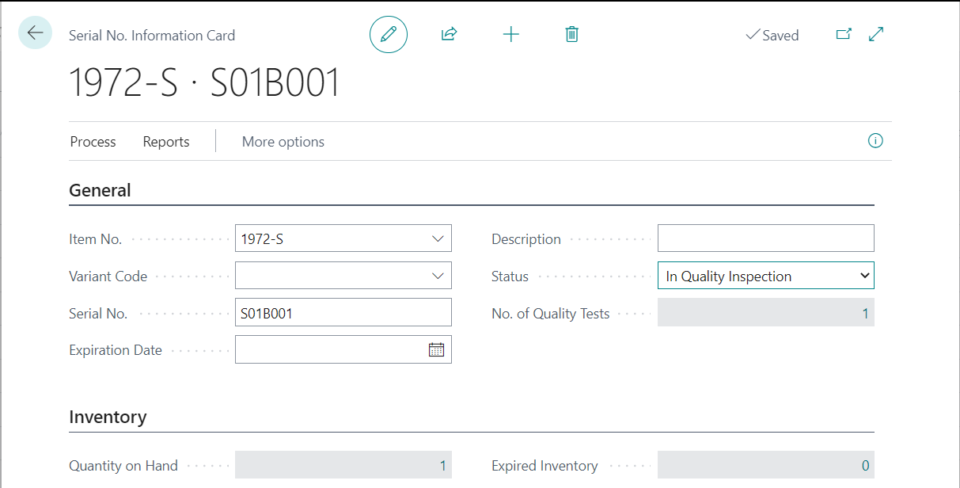
Click on the desired Item No., this will open the Serial. No Information Card. Here you can find all related Information and the Status of the Serial No.: Unrestricted, In Quality Inspection, Restricted or Blocked.
